Apple

Editing a Photo in Lightroom + Photoshop ... on an iPad

Not too long ago, I never would have considered editing my photos on an iPad. It always felt like something I should save for my desktop. But things have changed. Both Lightroom and Photoshop on the iPad have improved massively, and these days I often use them when traveling. More and more, this mobile workflow is becoming a real option for photographers.

In this walkthrough, I’ll show you how I edited an image completely on the iPad, starting in Lightroom, jumping over to Photoshop when needed, and then finishing off with a print.

Starting in Lightroom on the iPad

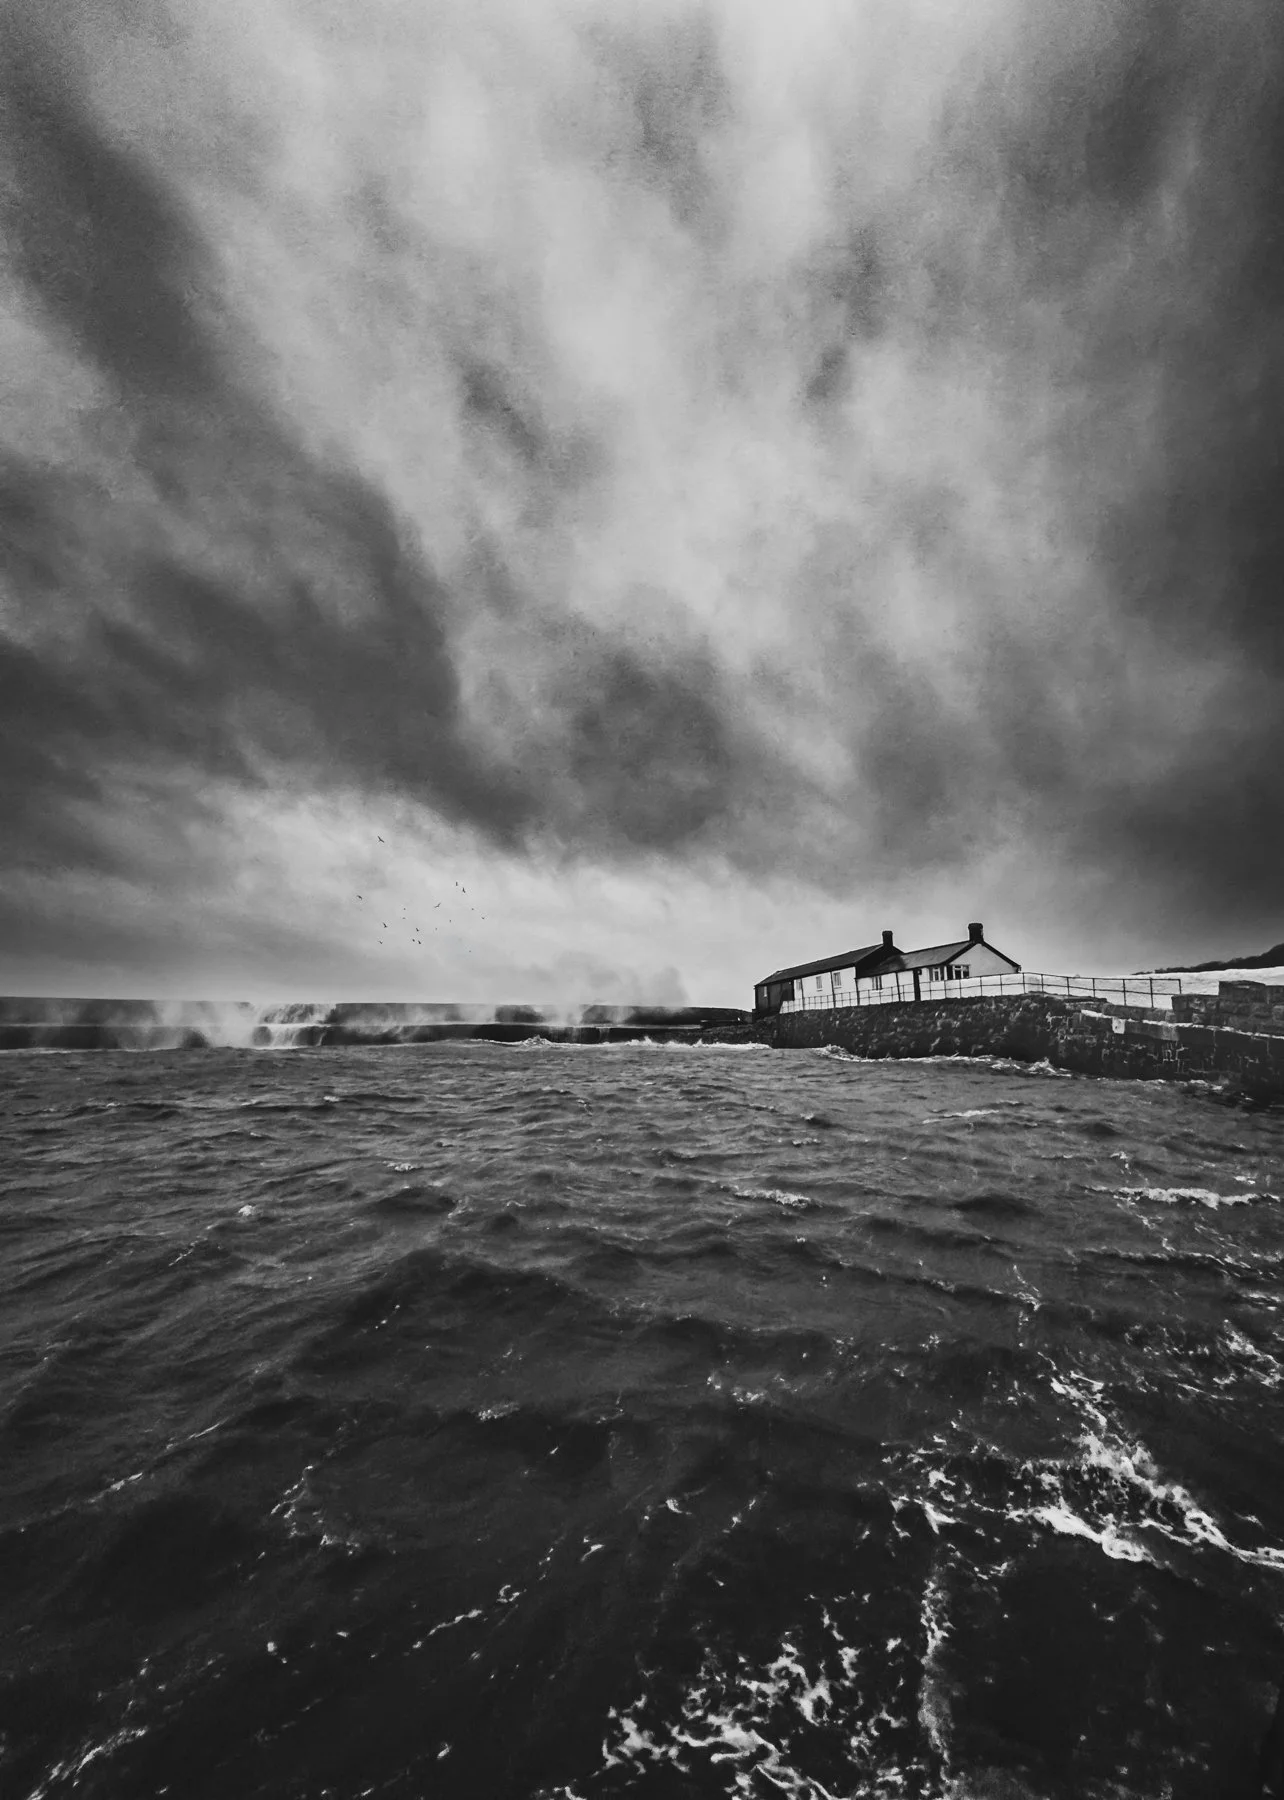
The photo I worked on was taken with my iPhone. The first job was the obvious one: straightening the image. In Lightroom, I headed to the Geometry panel and switched on the Upright option, which immediately fixed the horizon.

Next, I dealt with a distraction in the bottom left corner. Using the Remove Tool with Generative AI switched on, I brushed over the wall that had crept into the frame. Lightroom offered three variations, and the second one was perfect.

With those fixes made, I converted the photo to black and white using one of my own synced presets. A quick tweak of the Amount slider gave me just the right level of contrast.

Masking and Sky Adjustments

The sky needed attention, so I created a Select Sky mask. As usual, the AI selection bled slightly into the hills, so I used a Subtract mask to tidy things up. It wasn’t perfect, but it was good enough to move forward.

From there, I added some Dehaze and Clarity to bring detail back into the clouds. A bit of sharpening pushed the image further, but that also revealed halos around a distant lamppost. At that point, I knew it was time to send the photo into Photoshop.

Fixing Halos in Photoshop on the iPad

Jumping into Photoshop on the iPad takes a little getting used to, but once you know where things are, it feels very familiar.

To remove the halos, I used the Clone Stamp Tool on a blank layer set to Darken blend mode. This technique is brilliant because it only darkens areas brighter than the sample point. With a bit of careful cloning, the halos disappeared quickly.

I then added a subtle “glow” effect often used on landscapes. By duplicating the layer, applying a Gaussian Blur, and changing the blend mode to Soft Light at low opacity, the image gained a soft, atmospheric look.

Back to Lightroom and Printing

With the edits complete, I sent the image back to Lightroom. From there it synced seamlessly across to my desktop, but the important point is that all of the editing was done entirely on the iPad.

Before printing, I checked the histogram and made some final tweaks. Then it was straight to print on a textured matte fine art paper. Once the ink settled, the result looked fantastic — no halos in sight.

Final Thoughts

I’m not suggesting you should abandon your desktop for editing. Far from it. But the iPad has become a powerful option when you’re traveling, sitting in a café, or simply want to work away from your desk.

This workflow shows what’s possible: you can straighten, retouch, convert to black and white, make sky adjustments, refine details in Photoshop, and even prepare a final print — all from the iPad. And of course, everything syncs back to your desktop for finishing touches if needed.

Exciting times indeed.

Photographing Cars with my iPhone 15 Pro Max

Now primariy I’m a Portrait Photographer however this past few weeks, for the fun of it, I’ve been experimenting with my iPhone to see how it would fare when taking pictures of my car … both still and moving.

So a few weekends back I met up with friends in South Wales and headed to Crickhowell; an area I’ve photographed in before when working on this Harley image …

kit used

For these car photographs I was using my iPhone 15 Pro Max along with …

  • Polar Pro iPhone Case

  • 67mm Filter Adaptor + 67mm Circular Polarising Filter

  • ReeFlex Pro Camera App

CHECK OUT THESE ITEMS ON MY GEAR PAGE

The circular polariser is the car photographers secret weapon because of how effective it is in reducing / removing reflections in the car windows and on the bodywork …

I used the ReeFlex Pro Camera App purely so that I could use shutter speed and ISO to lock in the exposure that I wanted.

Here’s the ‘out of camera’ result …

Here’s the final retouched image which was done using Lightroom Desktop.

I also added a long exposure effect to the clouds using a technique in Photoshop which works really well however now I want to do the shoot again and capture it all ‘in camera’ using a long exposure app like ReeXpose or EvenLonger 😃

I also tried some panning shots and did get some results, however the ratio of keepers to rejects was very low.

I was trying to do this using the ReeFlex App and a Neutral Density Filter on the front of the iPhone so that I could lock in an exposed photographed at 1/30 second. However, the ReeFlex app at the time I did this did NOT have burst mode. This meant I was having to try to capture a single frame as I panned with the car passing at no more than 30 mph.

Here’s an edited result of what I managed to capture …

Later having shared this image online I spoke with a friend of mine who is a Professional Car Photographer. It was great to hear that he was impressed with the results expecially considering they were from an iPhone but he also gave me some settings that he and other pro car photographers use to capture a moving car.

My friend told me that moving car shots often see the car travelling at no more than 20 mph and that they also use a shutter speed of around 1/15 sec or 1/20 sec … but ALWAYS shoot in burst mode.

So armed with these settings I set about finding a pro camera app that would allow me to manually dial in the shutter speed but that also had Burst Mode; and the app I turned to was MOMENT.

I’ve yet to use the app in a planned car shoot however when in Germany a couple of weeks back I was waiting for a friend to pick me up and whilst waiting near a fuel station forecourt I attached the Variable Neutral Density Filter to my iPhone using the Polar Pro Case and Adaptor, and set the shutter speed using the MOMENT app.

I then simply took a burst of panning shots of passing cars as they negotiated a roundabout and drove away, which from my position would have meant them travelling around 20 mph.

Here’s some of the results …

So, yeah I’ve been very impressed with how the iPhone has dealt with this and the results I’ve managed to get.

Lots more experimenting and fun to be had!

ShiftCam ProGrip: The Best iPhone Photography & Video Grip?

Is the ShiftCam ProGrip the ultimate accessory for iPhone photography and videography? In this video I give you hands-on honest look both positive and negative of this iPhone Traditional Camera Style Grip; its ergonomic design, wireless charging, and enhanced grip to see if it truly transforms your iPhone into a pro camera setup. Whether you're a content creator, mobile filmmaker, or just love taking photos, this grip might be a game-changer!

🔹 What You’ll Learn in This Video:
✔️ Hands-on review of the ShiftCam ProGrip
✔️ Key features & benefits for iPhone photography & videography
✔️ How it enhances stability, ergonomics, and battery life
✔️ Is it worth the price?

📌 Check out the ShiftCam ProGrip and other Mobile Accessories I use here: ( LINK )

Mobile versus Mirrorless: Decisions to be made in 2025

Watch the recording of this LIVE Broadcast as I chat with my friend and Photographer Brian Matiash (Adobe Lightroom Team) and discuss using Mobile devices for Photography.

Should I continue doing so in 2025? Lenses and Filters for Mobile, What I’ll be using my Sony Mirrorless for, What do I make of the OM1 MK2 and a whole lot more ...

links mentioned in the video:

  • Brian Matiash Website: ( LINK )

  • Brian Matiash YouTube Channel ( LINK )

  • Glyn’s Lyme Sunset Picture + Edits in the Lightroom Community: ( LINK )

NOTE
If you’d like any of your images to be considered for one of my ‘LIVE RetouchingBradcasts’ simply create a Collection (Lightroom Classic) or an Album (Lightroom Desktop) and Share it with me at gadewis@mac.com making sure that you set permissions to Edit and not just View.

My First Photography and Print of 2025 : Stormy Sea on New Years Day 2025

There’s no better way to kick off the New Year than doing something you love, and for me, that means grabbing my camera, which in this case was my iPhone, and heading out to take some photographs; and this January 1st did not disappoint with a stormy high tide.. How could I resist?

My wife Anne, who’s as much of a storm lover as I am, joined me to not only keep me company, but she also helped capture some behind-the-scenes footage, which added to the fun of the morning.

We headed down to The Cobb ( Lyme Regis) and straight away it was a WOW moment!

The waves were crashing hard against The Cobb sending water shooting high into the air like fireworks. The sound was thunderous, the kind of deep, powerful roar that makes you feel alive just being near it.

I knew where I wanted to head to … the only issue was getting there; the lower part of The Cobb to the side of the Aquarium. The problem here was that water was crashing and pouring over The Cobb wall into the Harbour like a giant Ice Bucket Challenge ( remember that??? ) , however I’ve learned my lesson and now travel with full wet weather kit in a bag in the boot of my car.

Still, even though I was weather-proofed it meant timing the run to perfection to avoid the weight of the water crashing down on me … which I’m rather proud to say I managed to avoid.

Weather like this always fills me with excitement BUT that said you do still need to have your wits about you. No photogbraph is worth putting yourself and others at risk. I never want to be THAT guy!

Once at the side of the aquarium I was able to photograph the small beach area behind it and still be safe, protected by a wall and railing. I managed to get the composition I wanted, grab some shots but then the wind seemed to pick up a bit more. So, I decided enough was enough and timed a run back to Anne ( who was near the RNLI Station ) without getting hit by any waves breaching The Cobb Walls.

Actually on this, I’d heard some time ago that waves come in 7s and it did see to be the case. Running there and back I initially counted 7 clear waves breaches and then ran and managed to avoid getting soaked so, clearly there’s some truth in it; if not and it was pure fluke, I’m getting an extra Lottery ticket this week 😃

As for my iPhone, I used the native 0.5 ( 14mm ) lens and the native Apple Camera App set to Apple ProRaw. The image was edited using Lightroom Mobile on my iPad Pro.

So now I’m up and running; first photograph and print of 2025 is ‘in the bag’ 😃

After walking around a bit more, grabbing some extra shots and some video footage, it was time for breakfast at our favourite spot … Town Mill Bakery.

So here we are in 2025. I’m now really looking foward to the coming months as I plan to be visiting some other coastal locations across Dorset, Devon, Cornwall and Wales ( West and North ) … and my thoughts are that I’ll be doing this with my iPhone to push it that bit more and see what I can get with such minimal kit.

I’ll keep you posted.

Happy New Year!

Photographing Storms in the UK with my iPhone and Friends

There’s something special about heading out with your camera (or iPhone as it was for me) when a storm is brewing. It’s that mix of excitement, unpredictability, and the chance to capture nature at its wildest and recently, I had the chance to photograph two big storms—Storm Bert and Storm Darragh.

Storm Bert at Lyme Regis

First up was Storm Bert on the seafront at Lyme Regis with my good mate Steve Healy.

Lyme’s one of those places that looks stunning in any weather, but during a storm it really is next level.

The wind and rain was relentless, whipping around us as we walked along the seafront. The waves were smashing into the harbor wall, sending spray high into the air. At one point, I got completely drenched from the knees down (see photo below) by a rogue wave, but hey it’s all part of the fun, right?

I used my iPhone 15 Pro Max with the Lightroom Camera app, and honestly, it was spot on. The light was constantly changing, but using the phone to capture it was a breeze (no pun intended).

We took some time out for a bit of shelter and grabbed a coffee in the seafront Café, SWIM and it just so happened that on ther next table were a couple of people who had a dog, and well …

I couldn’t resist grabbing a photograph with my iPhone

I edited the portrait quickly in Lightroom on my iPhone and then showed the owners, who loved it and asked if I’d send it to them.

This again showed to me how powerful a mobile workflow is; being able to take a photograph and immediately edit it and sent it, I find so bloomin’ exciting!

Storm Darragh at West Bay

A few days later, Storm Darragh rolled in, and this time, it was off to West Bay with my friend Brian Dukes.

If you know West Bay, you’ll know those golden cliffs are absolutely stunning, but throw in a storm and it’s a whole different scene.

Brian and I spent most of the time trying to keep our footing while scouting for the best angles but oddly the sea wasn’t as rough as we’d expected it to be and we actually spent more time on the other side of the harbor.

Why I Love Storm Photography

Here’s the thing about photographing storms: it’s not just about the pictures. It’s the whole experience—being out in the elements, feeling the wind batter you, hearing the roar of the waves, and just soaking it all in (sometimes literally!).

For me, it’s also about the people you share it with. Steve and Brian are brilliant company, and there’s something about laughing at each other while dodging waves that makes the day even better.

If you’re thinking of heading out to photograph a storm, do it. Just make sure you’re prepared (waterproofs are a must … as I have well and truly learned), keep an eye on the tides, and embrace the chaos. The photos are a bonus!

I’m really happy with the keepers from both Storm Bert and Storm Darragh but honestly, the best bit was just being there watching the storm do its thing.

Can’t wait for the next one. Bring it on!

Taking Photos with my iPhone and taking TIme Out

This past couple of weeks have been quite eventful to say the least and with all that’s happened I’ve found myself even more grateful than ever that I live near the coast.

For me, being able to take some ‘time out’ and slow down whilst looking at and listening to the waves crashing against the shore is medicine … pure and simple, and this past week it was much needed.

Here’s some pictures that I took this past week when I took some ‘time out’ just down the road at Lyme Regis using my iPhone and edited in Lightroom on my iPad.

Each of these pictures I’ve also added to my Lightroom Community Profile Page wheere you can see all of the retoching steps and also download them as a Preset to use on your own images ( LINK )

Handheld 1 second Long. Exposure using the ReeHeld App

From Movie Magic to Photographic Mastery | Lisa Carney

Thoroughly enjoyed chatting with Hollywood Movie Poster / Art Work Retoucher Lisa Carney and uncovering the HOW, WHAT and WHY of her personal work, her photography, process, retouching, personal projects and travel.

At the beginning of this recording check out the slideshow of her images and then learn how she captures and edits them because I guarantee, like me, you’ll be blown away!

Links mentioned in the video

Website: lisacarney.com (Portfolios, Photoshop Tutorials, Courses and more … )

Grief ( Art as Therapy - Personal Project ) LINK

Instagram: @lisacarney

The Lightroom Virtual Summit 2024: bit.ly/lvs-2024

Glyn’s Adobe Lightroom Community Page: LINK

Unsurprisingly, Lisa was a HUGE hit judging by some of the comments posted already from folks watching the recording …

Editing my Photographs in Lightroom on my iPad Pro

Now that I’ve been able to calibrate the screen on my iPad Pro, I’m really enjoying it when from time to time I retouch some of my pictures on it; reason being that the results on my calibrated iPad Pro are extremely close to how they look on my calibrated BenQ SW 272U Display.

I always struggled taking it seriously before now because it wasn’t calibrated and thought …

What’s the point when I’d then have to go and make corrections
in Lightroom on my desktop afterwards?
— Me (Before)

But now this is definitely not the case …

I actually had the technical folks at Calibrite reach out to me after having seen the iPad Pro calibration video I shared on my YouTube channel, asking if I’d be able to do a 2nd calibration to check whether the one I did was indeed accurate; and it most definitely was …

  • Target Luminance = 100cd/m2

  • Achieved Luminance = 99.355cd/m2

  • Target X = 0.3127

  • Achieved X = 0.313

  • Target Y = 0.3290

  • Achieved Y = 0.331

So yeah … the calibration of the iPad Pro screen worked a treat!

If you didn’t see the video I put together showing how to calibrate the iPad Pro and whaich also makes sense of what all this Luminance, X and Y stuff is all about, here it is …

So now, knowing that my iPad Pro screen calibration is good, I’m definitely making more use of it; not for every edit but just for those times when I just fancy sitting with my feet up in front of the TV and tinkering and when out and about on a phot shoot and then grabbing a coffee.

Also on those occasions if I haven’t finished the editing, when I get back home in front of my main computer I can just pick up in Lghtroom on my desktop from where I got to in Lightroom on my iPad Pro; such is the way that Lightroom syncs across all devices.

Clever stuff!

Actually on the subject of getting home and diving back on to my main computer, I’ve some new kit coming that is going to improve my workflow, set up and backing up, so I’ll make sure to share about that here and in a video 👍🏻

Calibrating my iPad Pro for Photography

One thing I always do when taking portraits is shoot tethered and that always used to be with my camera connected to my MacBook Pro or laptop BUT that has now changed to being my iPad because its way more portable and convenient.

I use the CaptureOne app for the tethering which works so incredibly well .. literally just open the app, plug in your camera (you can also use it wirelessly) and you’re up and running. You can even use it to tether to your iPhone … if you have one.

The only problem i find is that the screen on the iPad out of the box is too contrasty … its set up so that it gives the richest colours and the deepest blacks for when using apps, watching movies, playing games, looking at pictures which is great but not ideal for when using it when tethering.

However I have the 6th generation 12.9” iPad Pro running iOS 17.3.1 and this has Reference mode and this we can use to kind of calibrate the screen to something more suitable for photography.

NOTE:
Reference mode is actually available on 12” iPad Pro 5th generation or later and requires iOS 16 or later.