In a world where AI can generate a photorealistic image in seconds, how do you prove that your photograph is actually real? That it was captured by a real camera, in a real place, by a real photographer?
That is exactly the problem Content Credentials are designed to solve, and in 2026 this technology is finally moving from niche experiment to something every working photographer needs to understand.
What Are Content Credentials?
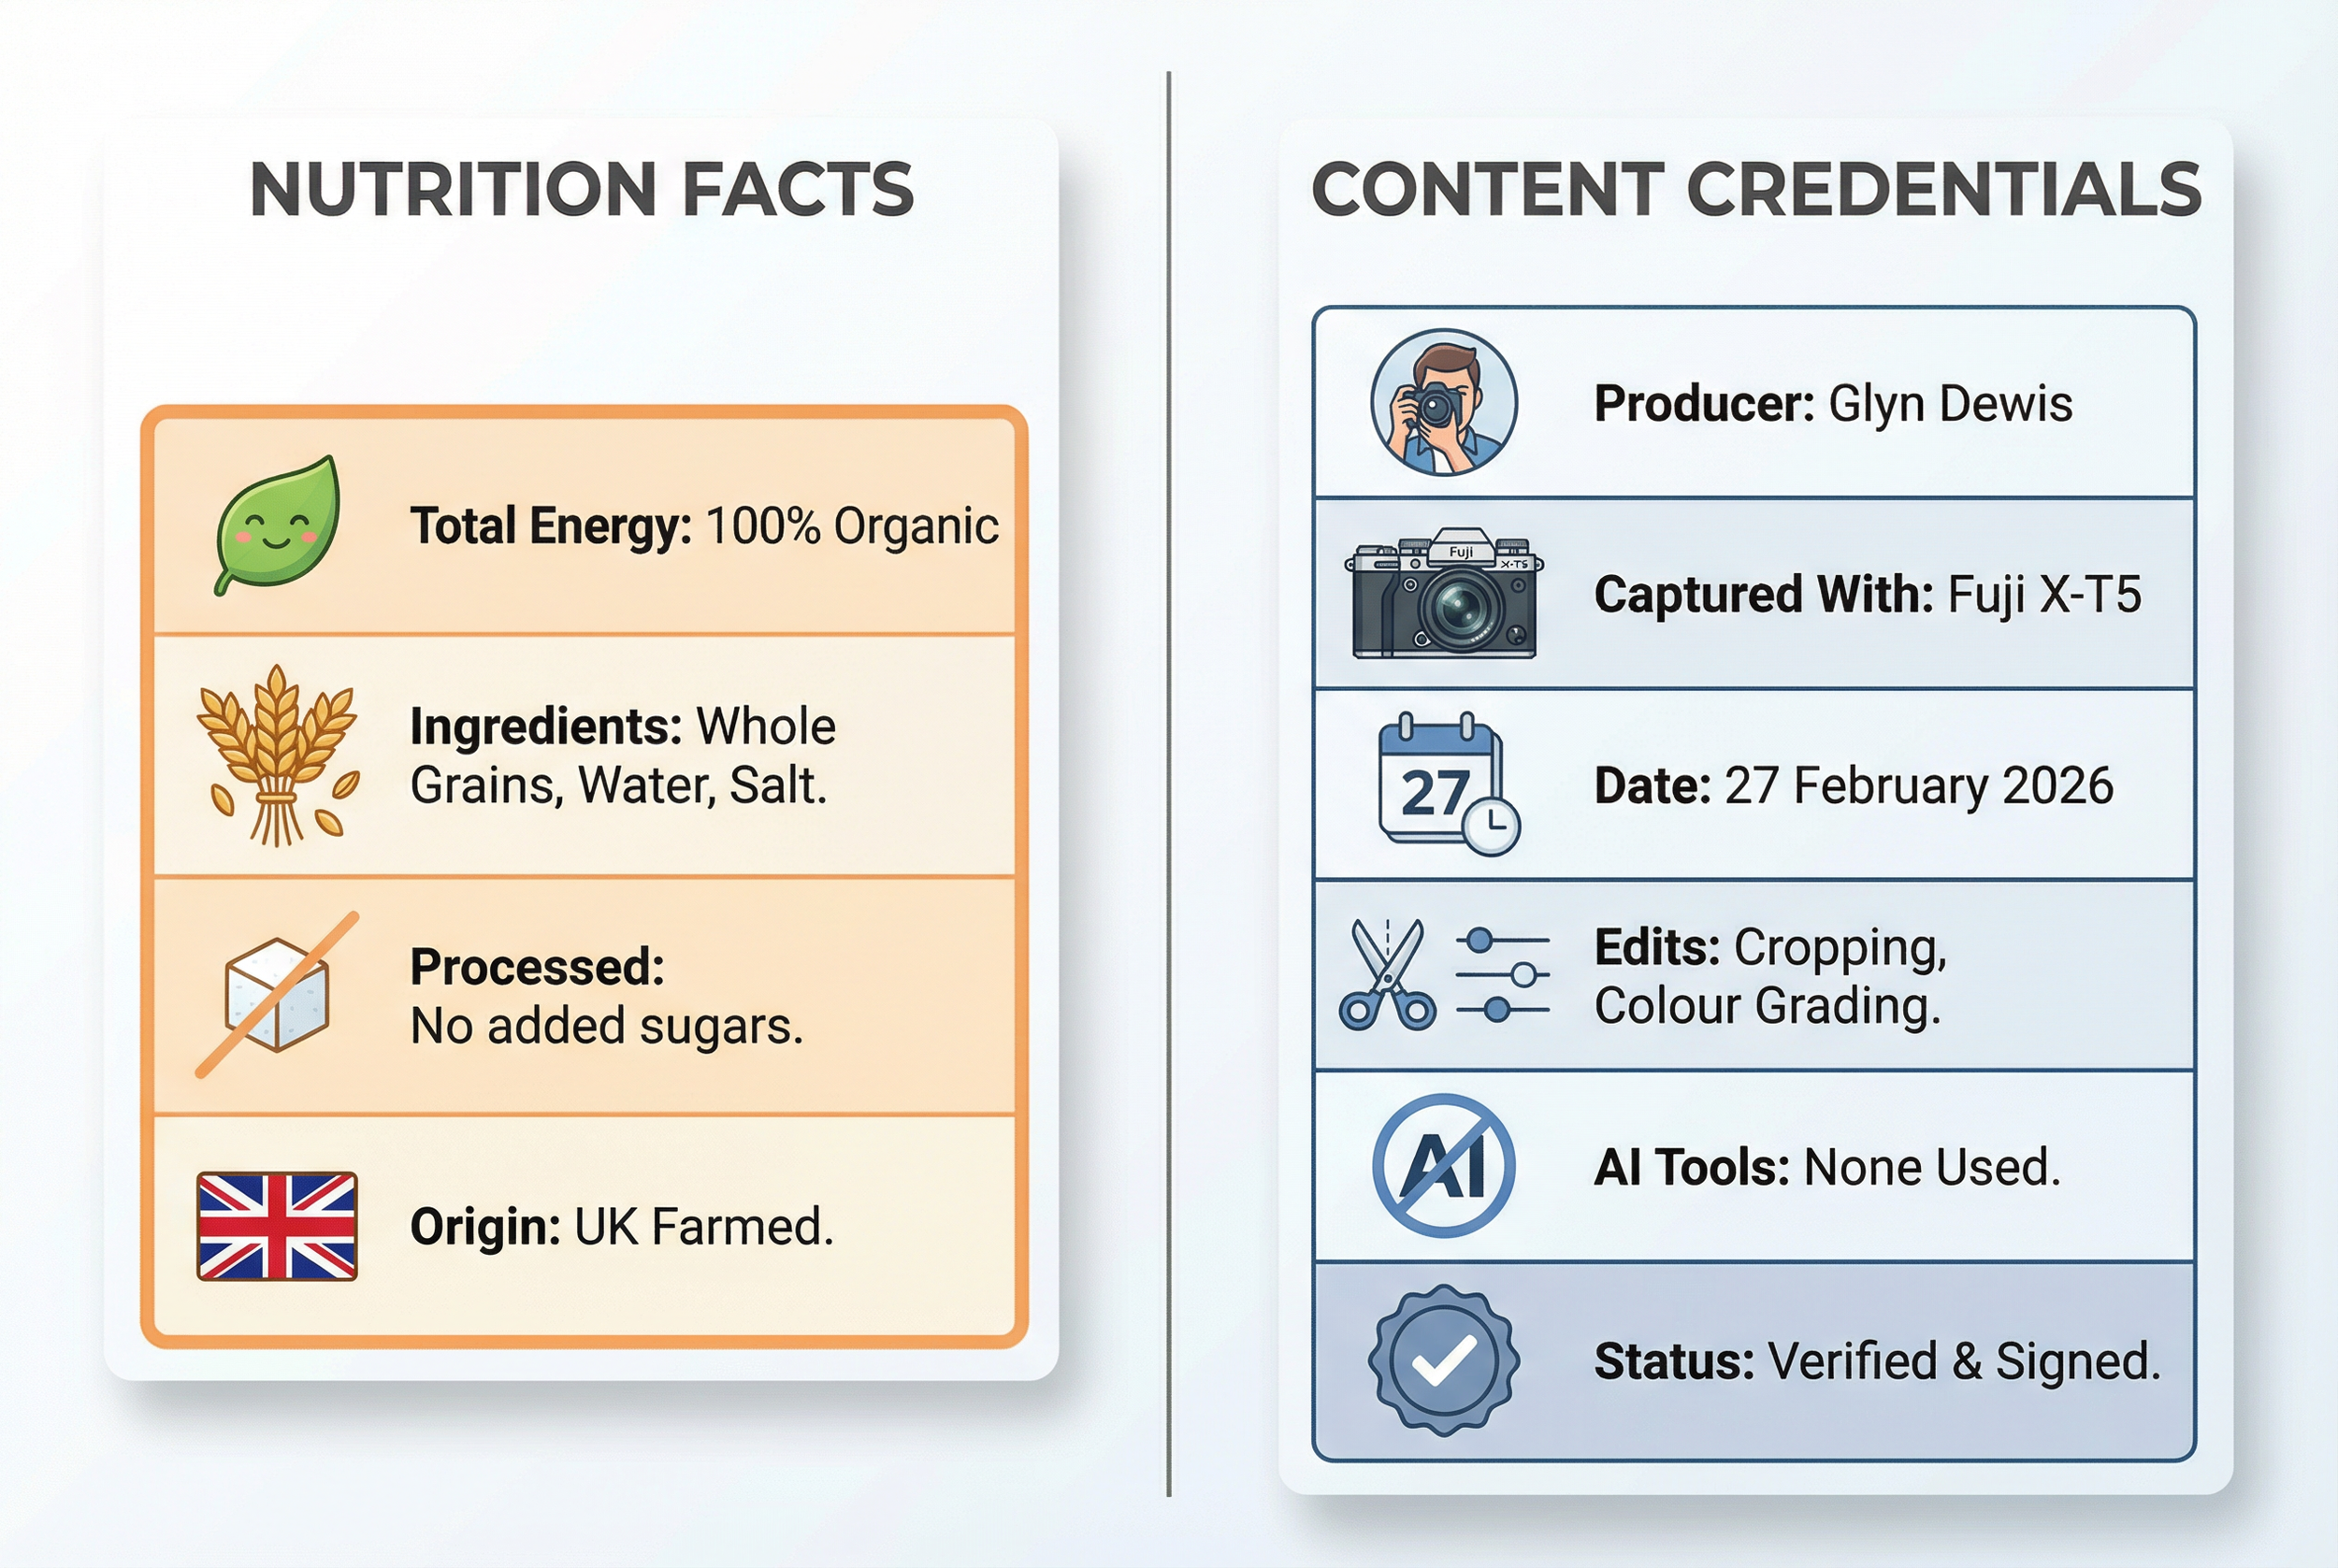
Think of Content Credentials as a kind of nutrition label for your photographs. Just as a food label tells you what is inside the packet, Content Credentials can tell viewers key facts about an image: who created it, which camera or software was used, what kind of edits were made, and, crucially, whether AI tools were involved at any stage.
Under the hood, Content Credentials are powered by an open technical standard called C2PA, which stands for Coalition for Content Provenance and Authenticity. C2PA is a cross-industry specification backed by companies and organisations including Adobe, Microsoft, Google, Sony, Nikon, Canon, Leica, Fujifilm, the BBC, the Associated Press and many others.
The key point is that Content Credentials do not judge whether a photo is "good" or "bad". They provide a tamper-evident record of provenance, meaning a factual history of where an image came from and how it was made, so that editors, clients and audiences can make their own decisions about whether to trust what they are seeing.
How Do Content Credentials Actually Work?
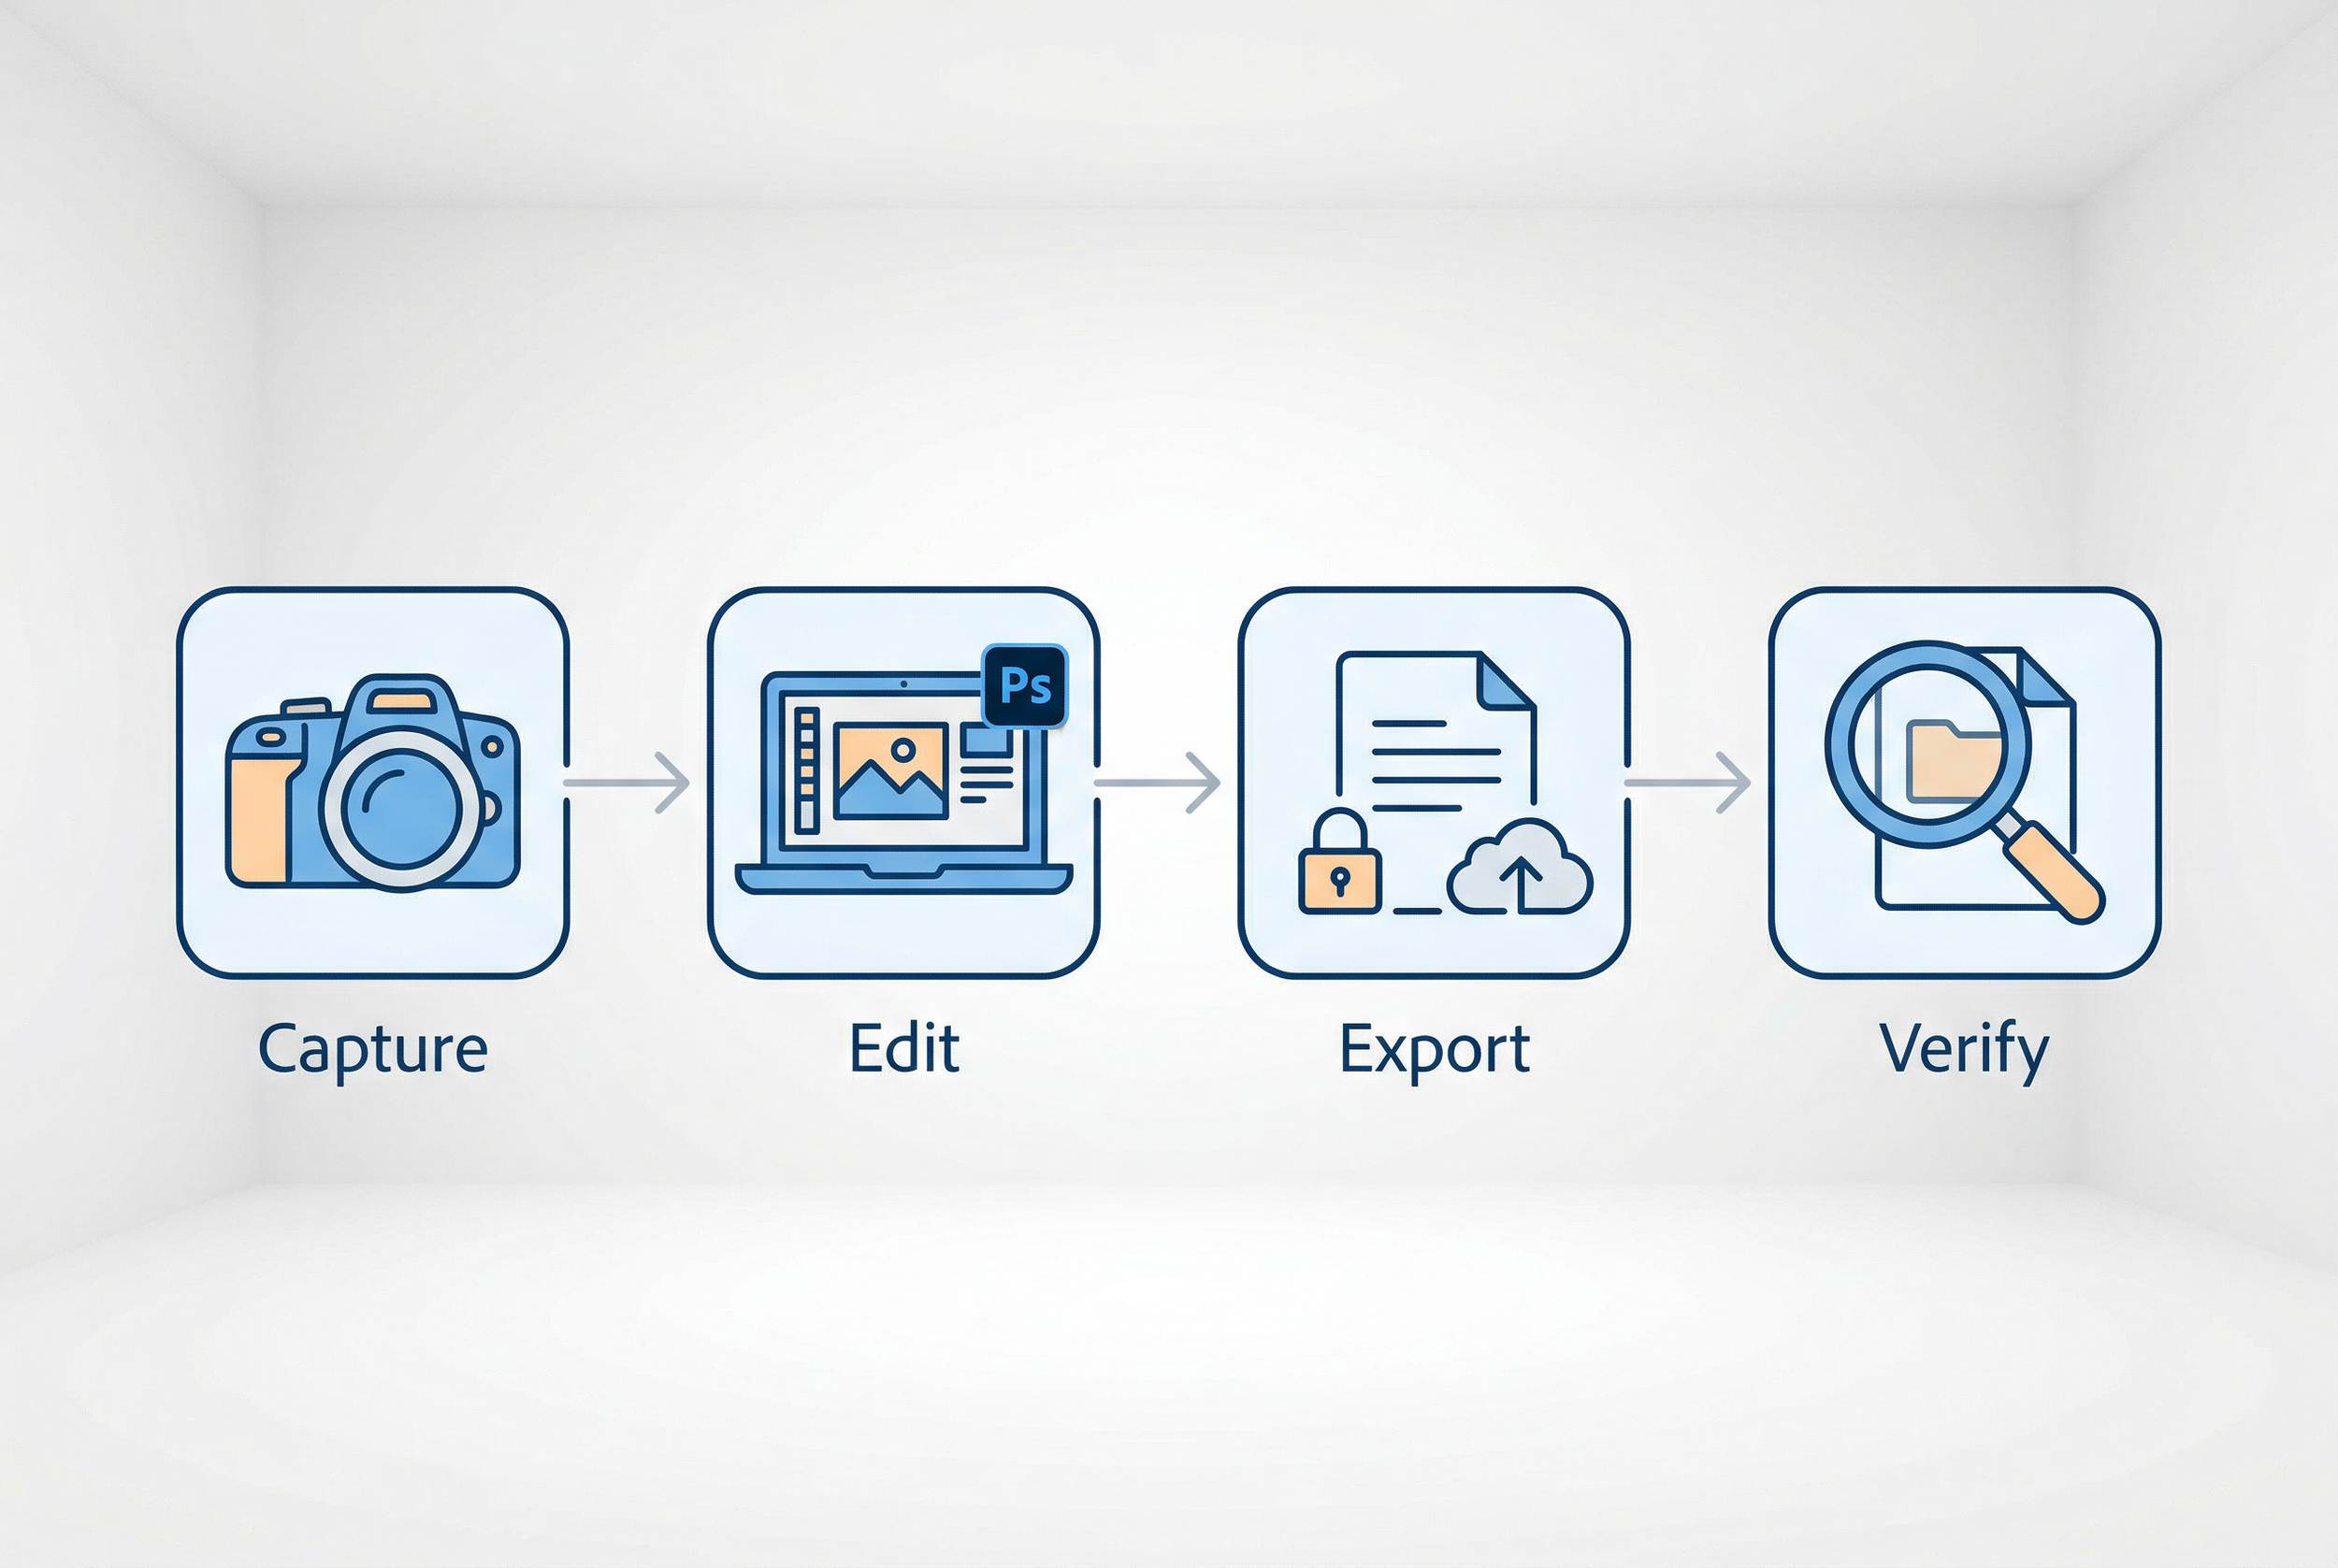
At a technical level, C2PA uses cryptographic hashes and digital signatures, the same kind of technology that protects online banking, to bind provenance information to media files. In practice, the chain looks like this:
Capture. On supported cameras, a C2PA manifest is signed at the moment of capture, recording the device identity and, where enabled, when and where the image was created.
Edit. When the photo is opened in C2PA-enabled software such as Photoshop or Lightroom, the software can log key edits, including the use of generative AI tools, into an updated manifest.
Export and publish. On export, the photographer chooses what information to include. The Content Credentials can be embedded in the file itself, published to a cloud service, or both.
Verify. Anyone can later inspect the credentials using tools such as the Content Authenticity Initiative's Inspect site at contentcredentials.org/verify, browser extensions, or compatible apps and services.
If someone tampers with the pixels or tries to alter the signed provenance after the fact, the cryptographic checks break. The result is that the credentials are tamper-evident: you cannot quietly change the file or its signed history without that being detectable.
Which Cameras Support Content Credentials in 2026?
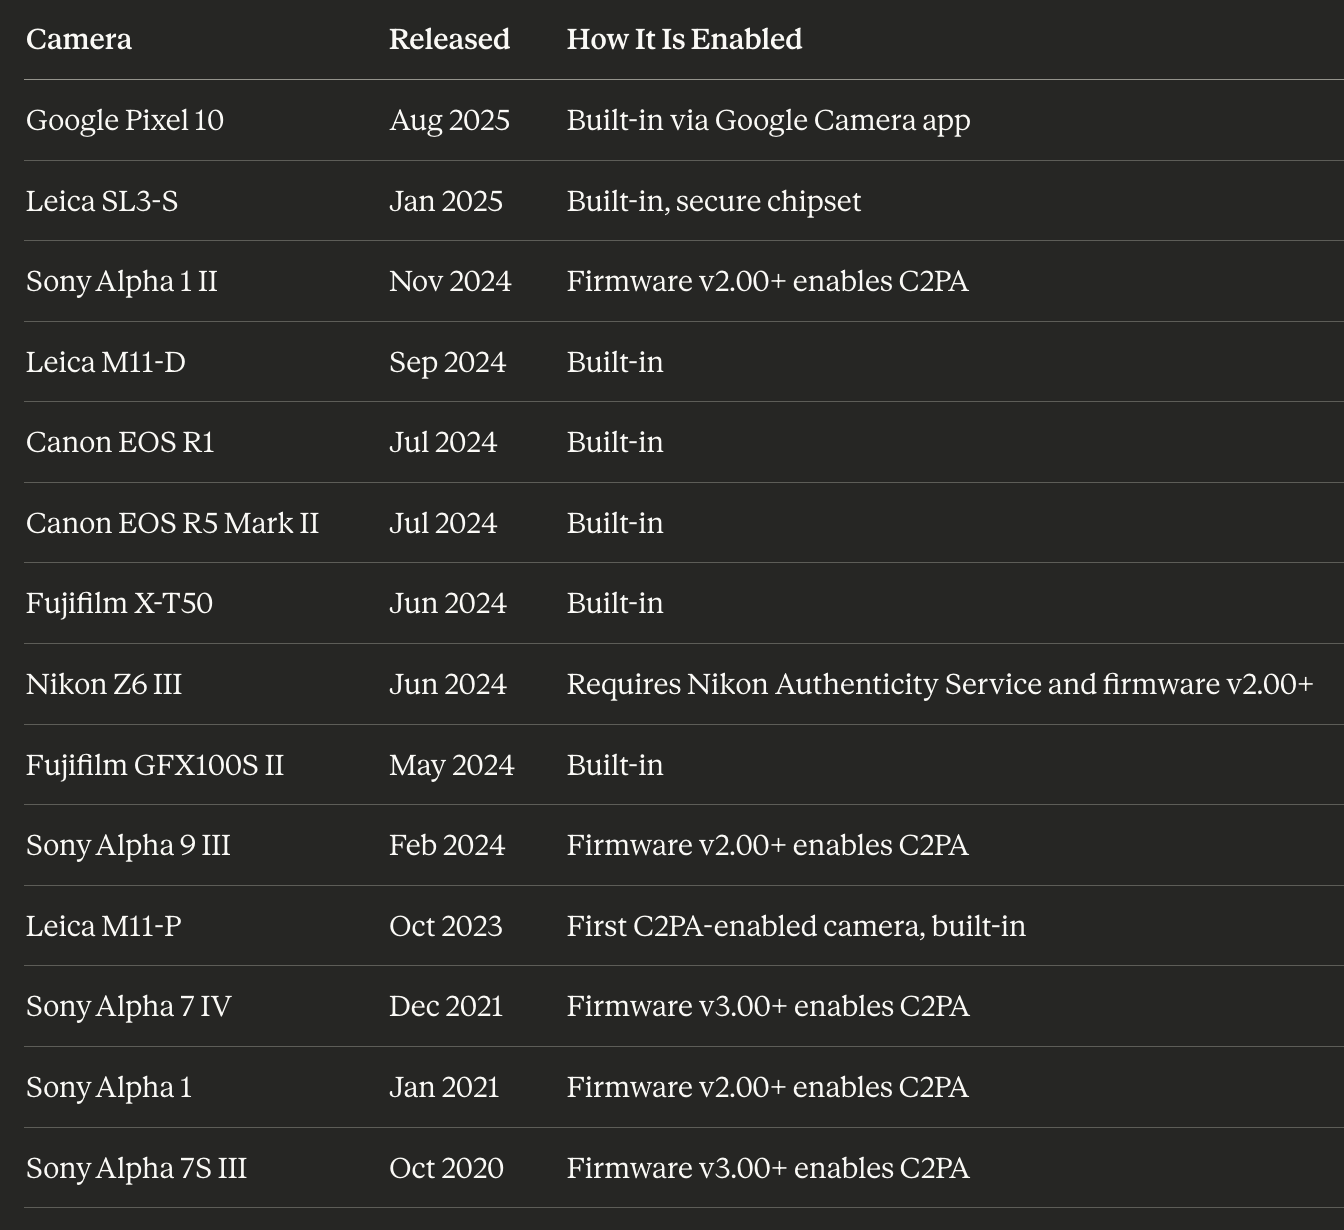
Camera support has accelerated over the last two years. A useful snapshot comes from the community-maintained c2pa.camera site, which tracks devices that can sign images using the C2PA standard.
As of early 2026, supported cameras include:
One particularly important entry is the Google Pixel 10. Thanks to its Tensor G5 and Titan M2 security chips and built-in C2PA support in the Google Camera app, it is currently the least expensive way to capture C2PA-signed images. That matters because not every working photographer or journalist will be carrying a flagship mirrorless body at the moment something newsworthy happens.
On the mirrorless side, Fujifilm has committed to rolling Content Authenticity support out across its X and GFX cameras, starting with models like the X-T50 and GFX100S II, with further firmware support planned but not yet fully detailed.
Content Credentials in Lightroom and Photoshop
The good news is you do not need a C2PA-enabled camera to start using Content Credentials. Adobe has built support directly into Lightroom Classic, Lightroom Desktop and Photoshop, using C2PA under the hood.
Lightroom Classic
In Lightroom Classic, Content Credentials are applied at export time.
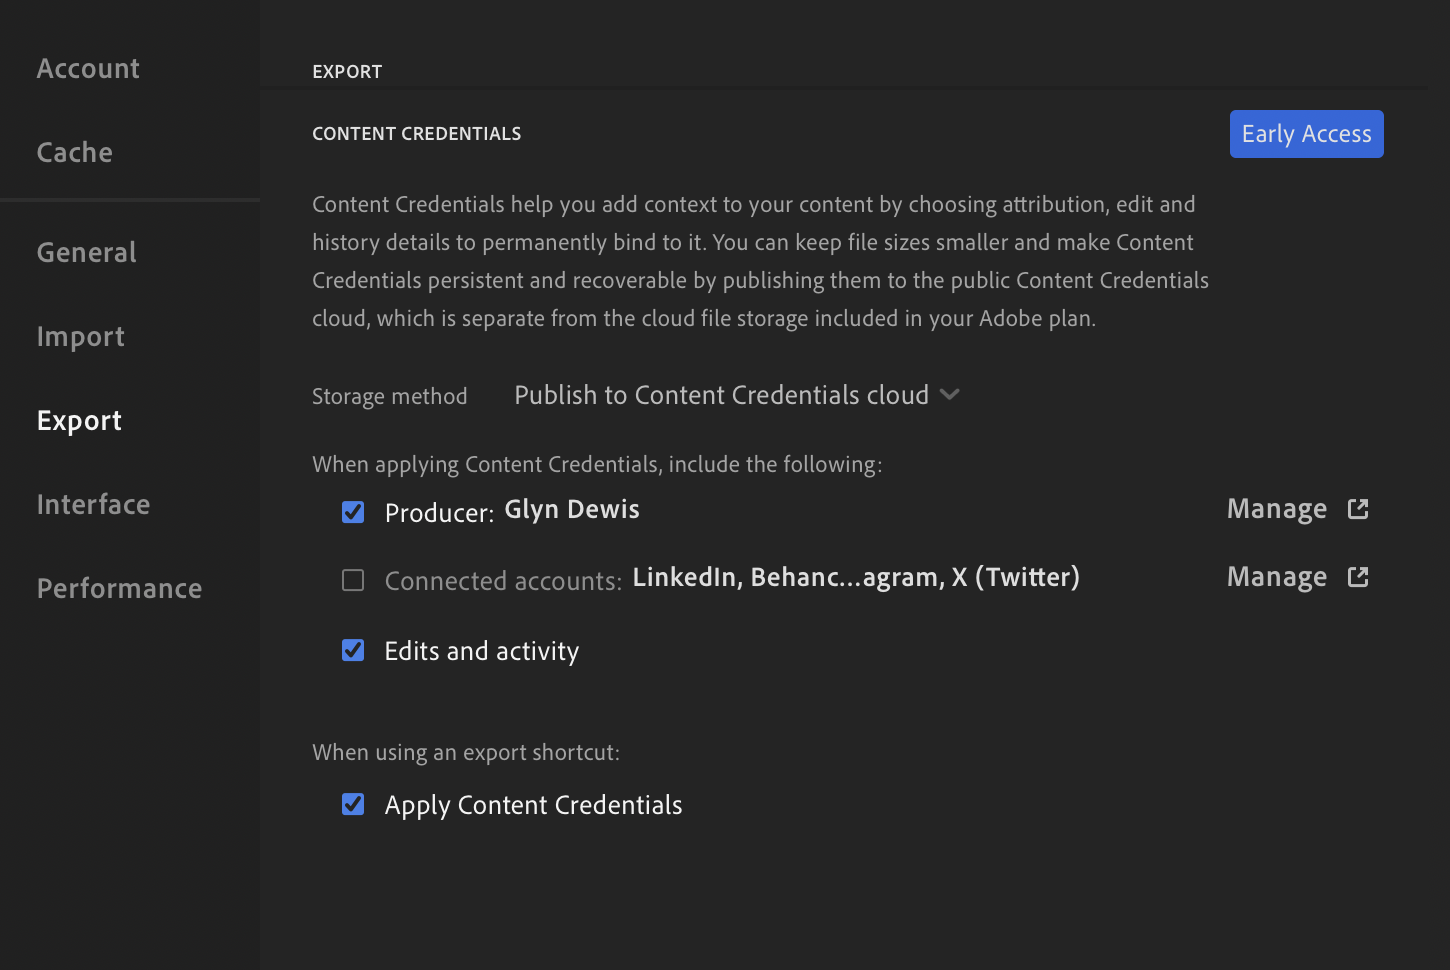
Open the Export dialogue and scroll to the Content Credentials section, then enable Apply Content Credentials. You will need to choose how the credentials are stored: you can publish to Content Credentials Cloud, attach them to files by embedding them in the JPEG, or do both at once, which is the recommended option for most photographers. You can also decide what information to include, such as your name from your Adobe account, any connected social accounts, and a log of the editing steps recorded by Lightroom.
A few practical limitations are worth knowing about in 2026. Lightroom Classic only applies Content Credentials on JPEG export, not on TIFF, PSD or RAW files. An active internet connection is also required for the feature to work, even if you are simply attaching credentials to files rather than publishing to the cloud.
Lightroom Classic
Content Credentials are set in the Preferences and Export section …
Photoshop
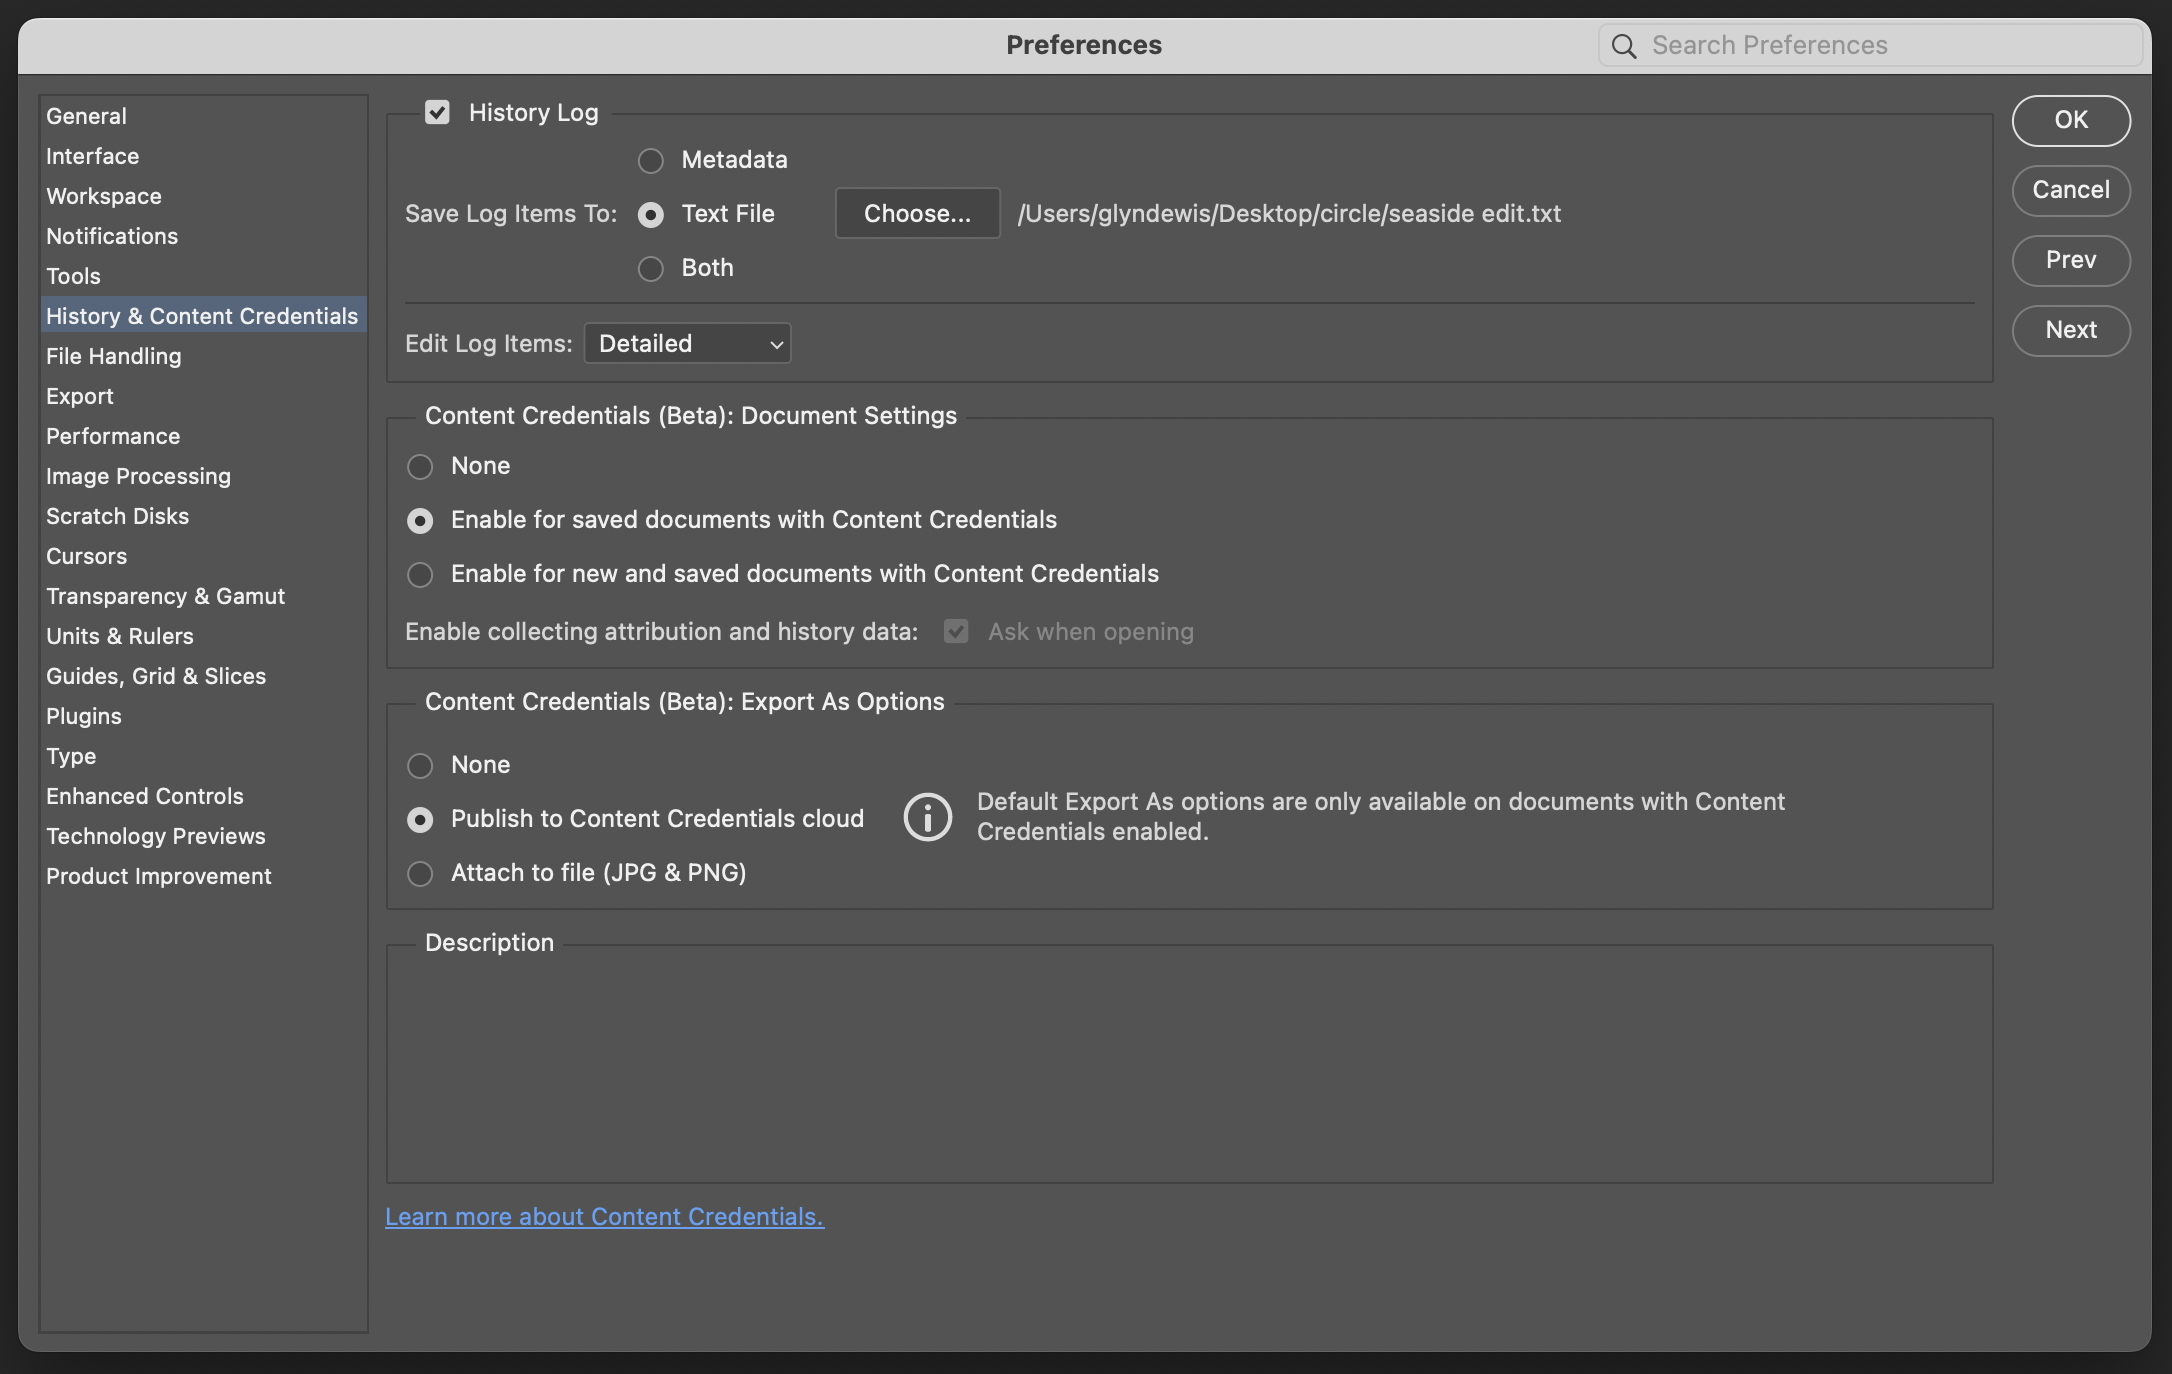
Photoshop takes a slightly different approach because it can record provenance while you edit. Go to Settings or Preferences, then History and Content Credentials, and enable Content Credentials for saved documents. For each document you can turn credentials on or off individually, so not every file has to be recorded. When you export, Photoshop can embed a detailed edit history into the Content Credentials, including the use of Generative Fill, Generative Expand and other AI-powered tools.
The system records a summarised, provenance-oriented history rather than every brush stroke, but enough to show that AI tools were used and how the file evolved over time.
Keeping the Chain Intact Between Lightroom and Photoshop
If your workflow moves between Lightroom Classic and Photoshop, it is worth thinking about the provenance chain. A robust approach is to export from Lightroom with Content Credentials turned on, then open that exported file in Photoshop with Content Credentials enabled for the document. Export again from Photoshop with Content Credentials, and if you want the final file back in your Lightroom catalogue, import the Photoshop export so that Lightroom sees the credentialled version.
Is it perfectly seamless? Not yet. But this approach ensures that each major step in your workflow adds to the same signed chain instead of breaking it.
Why Content Credentials Matter in 2026
Several developments make Content Credentials especially relevant right now.
Photo Mechanic and Press Workflows
In February 2026, Camera Bits confirmed that Photo Mechanic is gaining support for the C2PA standard. For decades, Photo Mechanic has been the first stop in press photographers' workflows, used for ingest, culling and metadata. Camera Bits' goal is to preserve C2PA signatures from C2PA-enabled cameras all the way through to publication, so editors can trust that a signed image really traces back to a specific moment and camera.
Camera Bits has been clear that this feature is still in active development with no public release timeline yet, but for photojournalism this is a significant shift.
Competitions and Clubs
The Canadian Association of Photographic Art has adopted a Content Credential model for its competitions to address AI-generated imagery. Their current stance, through at least 2027, is that the model is optional and educational rather than mandatory, but potential winning entries already undergo verification that includes Content Credentials analysis, AI detection and forensic checks. Images that fail those verification steps can be disqualified, which is a strong signal of where competition rules are heading.
Platforms and the Broader Ecosystem
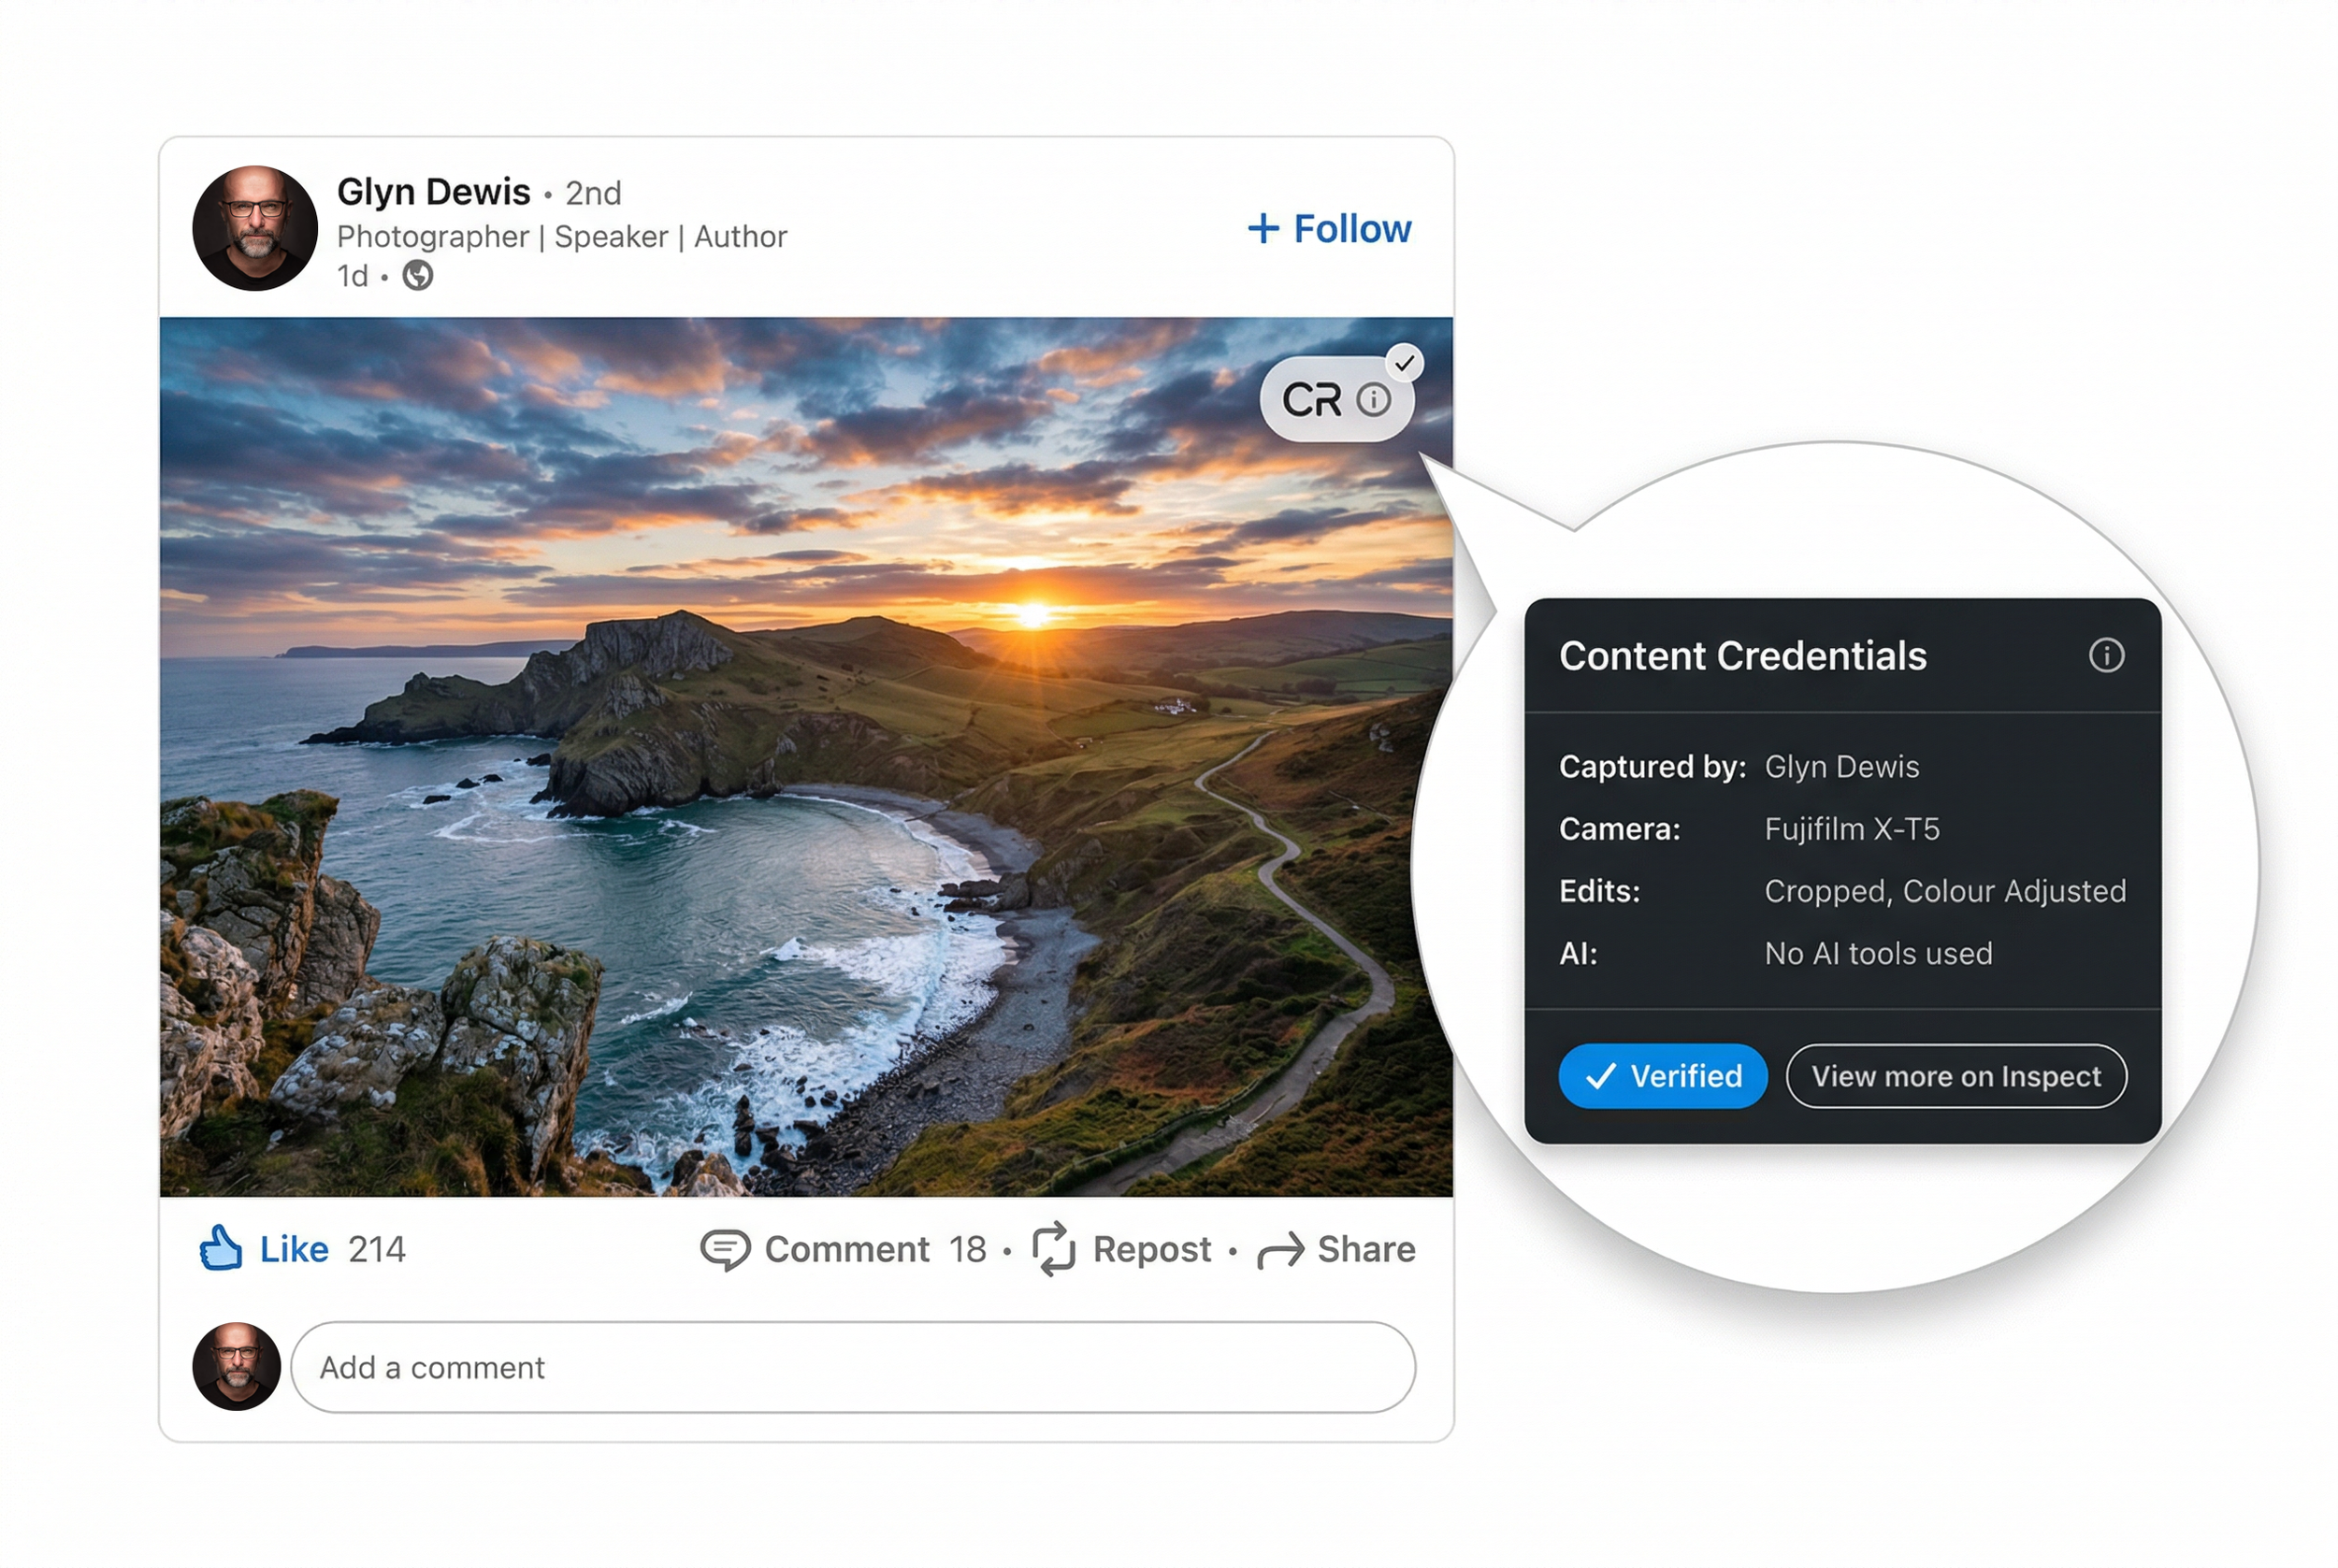
On the platform side, there has been real movement. LinkedIn now displays a CR icon for images carrying Content Credentials, which users can click to see the provenance summary. Google has brought C2PA-based Trusted Images to Android and Pixel, using Content Credentials and SynthID to distinguish originals and AI-generated content. Cloudflare Images and other services now preserve Content Credentials through transformations, so the provenance remains intact when images are resized or optimised for delivery.
The Content Authenticity Initiative itself has grown into a global community of more than 6,000 members by the end of 2025, spanning media, tech, education and government. This is no longer a small experiment.
The Honest Challenges (As of 2026)
That said, Content Credentials are not magic, and the current limitations are worth being transparent about.
Social Platforms Still Strip Metadata
Many social platforms still strip embedded metadata from uploads, which removes embedded C2PA manifests along with traditional EXIF and IPTC data. Tests have shown that platforms like Facebook remove Content Credentials on upload, which is one reason Adobe allows you to publish credentials to a cloud service as well, so you can still verify an image via the cloud record even if the embedded data is lost.
The Chicken-and-Egg Problem
Camera makers want platforms and tools to support provenance before they invest heavily. Platforms want a critical mass of signed content. Newsrooms want both to be stable before they change their workflows. PetaPixel's coverage of the Digimarc C2PA Chrome extension in 2025 summed up the situation bluntly: at that point, basically no photos published online were carrying C2PA metadata. That is slowly improving in 2026, but it remains an adoption loop rather than a solved problem.
The Perception Problem
At CES 2026, several analyses highlighted that many visitors misunderstood the Content Credentials icon, assuming it marked AI-generated content rather than authentic content with a provenance record. Without better public education, there is a real risk that authenticity labels are misread as AI labels, which is the exact opposite of the intended outcome.
Inconsistent Implementations
Some early implementations have also bent the semantics in unhelpful ways. Critics have pointed out that certain smartphone workflows only add C2PA manifests to images that have been processed with AI features, not to ordinary captures. That reverses the intent entirely: the real images are the ones that most need a verifiable credential.
Privacy and Identity
Finally, there is the privacy angle. C2PA and Adobe both make identity assertions optional and opt-in, so you choose whether to embed your name, social accounts or edit history. That flexibility is valuable, but it also means you should think carefully about what you are comfortable attaching to every exported file. For some photographers, including personal account details on every share will feel like a useful feature; for others, it may feel like over-exposure.
Should You Start Using Content Credentials?
For most photographers who share work online, the pragmatic answer in 2026 is yes, it is worth turning on now, even with the current rough edges.
There is no extra cost, as Content Credentials in Lightroom and Photoshop are included in your existing Adobe subscription and do not consume generative credits. They are non-destructive, meaning enabling them does not alter your image content or require a different editing approach. It simply adds metadata, and optionally a cloud record, at export.
Starting now also means you build good habits early. As more contests, clients and platforms start expecting provenance, having a back catalogue of signed images will be an advantage rather than something you are scrambling to retrofit. Organisations like the Canadian Association of Photographic Art explicitly highlight that embedded creator information and timestamps help strengthen copyright and attribution claims as part of a wider evidence chain. And the export settings give you control over privacy, so you can choose to share just a minimal provenance chain or a more detailed record including identity and edit history.
For photojournalists and press photographers, this is already moving from a nice-to-have to something expected. For commercial and fine-art photographers, it is a professional differentiator that signals authenticity and transparency at a time when clients are increasingly wary of AI fakery.
How to Check if an Image Has Content Credentials
If you want to verify an image, whether your own or someone else's, there are several options available. You can upload a file at contentcredentials.org/verify to see its provenance, including capture and edit history where available.
Adobe and its partners also provide browser extensions that detect and surface Content Credentials as you browse the web. On LinkedIn, look for the CR icon on images; clicking it shows the stored provenance for that image. Nikon users, editors and agencies can use the Nikon Authenticity Service to validate C2PA-signed images from supported cameras. And Leica's FOTOS app can read and display authenticity information for images from the M11-P, SL3-S and related cameras.
Where This Is Heading
The direction of travel is clear. The C2PA Conformance Programme and the CAI's growing membership are pushing the ecosystem towards more consistent implementations across cameras, software and platforms. Open-source tooling is making it easier for smaller developers to add support. And regulatory and industry pressure around AI transparency, especially in news and political advertising, is giving content authenticity a real tailwind.
As Camera Bits put it when discussing Photo Mechanic's planned support, the goal is not to replace trust in photographers, but to provide an additional layer of confidence in an environment where synthetic media is increasingly common.
For working photographers, the message in 2026 is straightforward. The tools are here, they are free to switch on, and they are only going to become more important. Enabling Content Credentials today is one of the simplest practical steps you can take to protect your work and to prove that it is genuinely yours.


