
This past weekend was an absolute blast!
I got to spend a full weekend with great friends (Ian Munro, Anthony Crothers and Gerwyn ‘Gez’ Williams) in South Wales; Saturday filming content for a presentation all about Tethering that I was giving at the Photoshop World 2021 Conference, and then Sunday at an incredible location for a Photo Shoot of a Harley Davidson and Biker.
The photo shoot brought with it a few challenges so I thought I’d share a look Behind the Scenes going through kit , setting choices , lighting and how I changed from my original plan of combining ambient and flash in one photograph , but instead , taking 5 separate shots lit with flash and combining them in Photoshop.
LOCATION
On the Saturday after finishing filming the presentation content, we headed out to a great location called Crickhowell, Llangynidr ( What3Words ///sporting.stepping.craziest )

This was going to be perfect for the look and feel I was after, ‘Freedom and the Open Road’ which seemed highly appropriate after the last 18 months or so that we’ve all been living with the pandemic.
I couldn’t have wished for a better location and with it being so close (just a 10 minute drive from Ian’s studio).
So, once an exact spot had been decided on, and the position of the sun checked using the PhotoPills App to see where it would be , we were all set for 11am the following morning.

After a quick coffee and light breakfast at a nearby coffee shop, we all then headed back to Crickhowell to start setting up before Steve arrived on his Harley.
The location we were using, understandably, is a very popular spot for locals and tourists; the views are incredible. BBC Top Gear also use the roads for filming and when you’re there it’s no surprise why, seeing how they wind down between the vast landscape. It really is a stunning place.
COMPOSITION
Having arrived, shortly after we could hear the unmistakeable sound of the Harley coming up the other side of the hill towards us as Steve also arrived.

LENS CHOICE
Ideally for this shoot I wanted to use the sharpest lens I had with me which would have been the 85mm G-Master, however the composition I wanted would have meant me being way back. Not a problem for triggering the wireless lights or for the tethering, however, it would have meant going further back over the brow of the hill and this changed the composition not being able to see the tyres of the motorbike touching the road, and also not seeing the full sweep of the road as it snaked downhill…

85mm meant being too far back and not the desired composition
Unable to use the G-Master, I opted for my 55mm Prime Lens which is still a great, sharp lens and this did allow me the composition I was after with a great angle on the motorbike and a real sense of the road winding down and away…

55mm allowed for great composition of both the bike and road disappearing in the distance
LIGHTING
I only ever intended to use one light for this shoot; the only consideration was what, if any, modifier I would use.
The weather was glorious, but also , ever so slightly challenging; there was bright (almost) midday sun but also plenty of cloud, meaning that one moment would be hard light and hard shadows, but the next (seconds later) cloud cover would give flat, soft light.
Initially I thought of using a Large Octa Softbox and taking off the outer diffusion panel to harden the light a little…

Friends Ian Munro and Gerwyn ‘Gez’ Williams; Ian on the Harley and Gez holding the light
This didn’t work out for a couple of reasons:
The light was changing so quickly and so dramatically it would have meant constantly taking the diffuser on and off to match the lighting on Ian and the light in the environment.
Even using High Speed Sync, shooting at 1/400 sec, I wasn’t getting enough light on Ian.
I decided to use the bare flash, my Westcott FJ400, with the 55 degree reflector that it comes supplied with.

This worked a treat, however, because I was no longer using the Large Octa, I wasn’t getting the spread of light I wanted to land on Ian and the bike.
Gez standing further away from Ian with the light didn’t work either because:
a) it reduced the power of the light on Ian (I needed full power shooting in HSS at this time of day)
b) the further away the light would be, the harder the light on Ian.
c) it was too dangerous due to the constant stream of passing traffic
*HSS = High Speed Sync

Gez with the Westcott FJ400 and 55 Degree Reflector
THE CHALLENGE
So, what to do?
I needed the light in closer because of the power output, but I also needed more surface area to be lit.
THE SOLUTION
With the camera on a tripod, take a series of photographs (up to 5) in quick succession and with Gez moving the light to a different position for each; Ian would just need to keep as still as possible for the few seconds it would take.
The 5 photographs comprised of:
Ian’s Head / Face and Upper Body
Front of Motorbike
Ian’s lower body / legs and middle area of the Motorbike
Ian’s back and rear of Motorbike (Gez out of shot)
Ambient light photograph (no flash) (Gez out of shot)

1.

2.
3.

4.

5.
With these 5 photographs it meant I had all the necessary areas lit how I wanted, AND I had photographs (4 and 5) where Gez holding the light was not visible.
With these 5 images in the computer , all that had to be done , after an initial edit in Lightroom was synced across all 5 , was to open all of the photographs in Photoshop with one ontop of the other in the layer stack, and simply mask out the areas from each that weren’t needed / wanted.
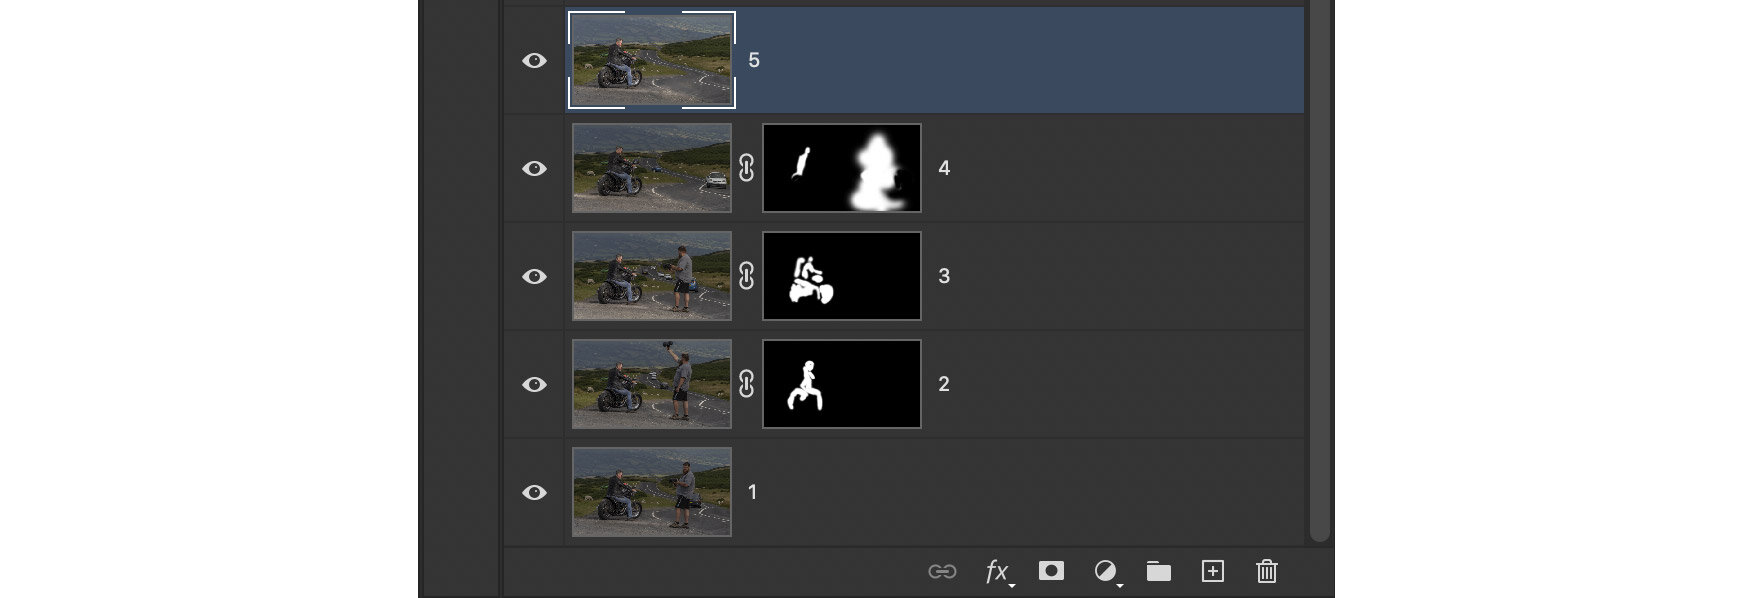
Once I’d masked in / out all the relevant parts of each photograph, I could then get on with the rest of the retouching giving the picture it’s final look…

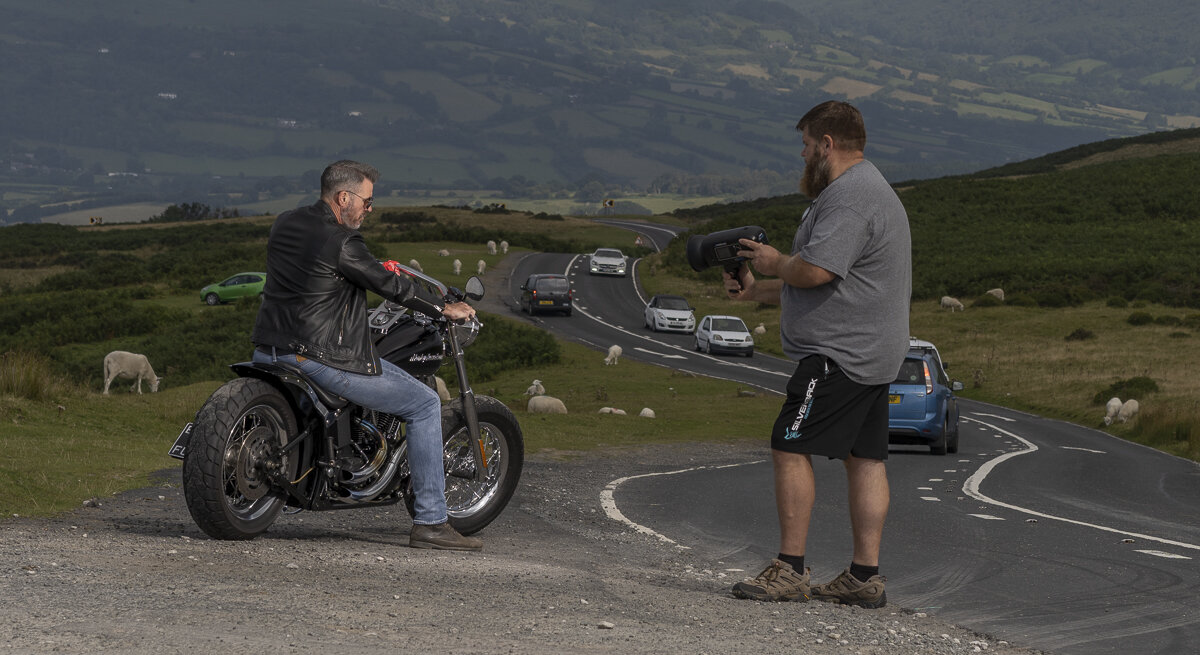
Having photographed Ian, it was great that I was able to get a photograph of the bikes owner, Steve too.
Can’t wait to print this now and head back to Wales with a copy for him…

KIT
Here’s the kit that I used for this photo shoot…
Camera: Sony A7RIV
Lens: Sony 55mm f/1.8 ZA (Zeiss)
Flash: Westcott FJ400 (including 55-Degree Reflector)
With regards to the lighting, even though the FJ400 and 55-Degree Reflector would ordinarily produce a hard light, this can also provide soft light when not aimed directly at the subject. Aiming past the subject means they’re lit by the soft outer area of the beam of light.
To picture this, think of what it looks like when you shine a torch directly at a wall / surface; the centre is the brightest, hardest part of the light but going further out the light becomes not so bright and not so hard.
Knowing that I could do this came in extremely useful because of the lighting conditions being hard and bright one moment, and soft and cloudy the next. Just angling the light slightly meant we could very quickly and easily go from hard light to soft light without having to change a modifier.
SETTINGS
If you’re interested in settings, then here’s what I ended up using; maybe changing the shutter speed a little on occasion to ensure the ambient light in the scene was how I wanted it…
ISO 50
f/6.3
1/400 sec
High Speed Sync with FJ400 on Full Power (400ws)
APERTURE
f/6.3 is a sweet spot on this lens but that wasn't the main reason for choosing it as an aperture for this photo shoot
The road going off into the distance was a major part of the picture and why this location was used. Opening up the lens to around something like f/4 or wider, to allow more light from the flash when using the High Speed Sync (Aperture controls Flash Power , Shutter Speed control Ambient Light) would have made the road more out of focus which I didn't want; I really wanted the viewer to be able to follow the road.
TETHERING
If there’s one thing that’s had a huge positive impact on my photography over the years, it’s tethering.
There’s so many reasons for this and I’ll likely cover them in an upcoming article, but what I will say is that I very much doubt I would’ve got the shots I did during this shoot without it. The sun was so bright, and no matter how much brighter I made the screen on the back of the camera, reflections made it incredibly difficult to see anything.
I also don’t like using a loupe to view images on my camera; I find them cumbersome and fiddly having to cover the screen then press your eye into it and then zoom in. It’s just hassle and no good if you want to show others either. Seeing your images on a larger screen such as a laptop or mobile device (iPad) makes such a difference.
My go-to tethering method is wireless using the AirDirect from TetherTools into Software called Smart Shooter 4 (from TetherTools). It works a treat and sending over high quality JPEGs is virtually instant. I set my camera to shoot both RAW and JPEG files. The JPEGs are great for checking sharpness, composition and everything else; the RAW files I keep on the camera and download once back home.

Check out my GEAR Page
VIDEO: BEHIND THE SCENES
Here’s a video showing a Behind the Scenes look at the photo shoot.
It would have been great to spend more time getting video content on the day using dedicated kit, but it just wasn’t possible; we were shooting in a LIVE location with cars passing close by and members of the public moving around.
However, I did manage to grab some drone footage at the end before we packed up. Ian also got some footage using one of my cameras on my DJI Ronin RS2 Gimbal, Gez grabbed some video with his phone and Anthony managed to capture lots of video AND stills on his phone and camera whilst he was running around helping, as well as keeping us safe from passing cars.
So, here’s what I managed to pull together from the bits we all took…
IN CLOSING
This was such a great weekend; a weekend spent with great friends and all of us doing what we love … creating content.
Thanks so much Ian, Anthony, Gez and of course a BIG thank you to Steve Gomer Evans for bringing along his fantastic Harley Davidson, and for also getting in front of my camera :)
Anyway, I hope this has been useful / interesting in some way, and as always, if you have any questions / comments then please feel free to make use of the comments section below and I’ll make sure to reply.
Keep well,
Glyn

