
A few days ago, my wife and I took the short drive from home over to beautiful Lynmouth as I’d had an idea about creating a timelapse showing the tide coming in.
Having checked the tide times we arrived just after 3pm with an expected high tide of around 8.05pm and as hoped expected, the tide was out and the boats in the harbour were resting on the sand.
Not much was going to be happening for about an hour so I planned to start capturing the photographs from around 4pm.
We couldn’t have picked a better evening. The clouds were plentiful, the light from the sun was stunning and the sea was like glass…beautifully calm.
Having started, after just over 4 hours here’s the result along with some drone footage taken with my DJI Mavic Mini 2…
I’ll share the settings I used in a moment but here’s the kit I used…
Camera: Sony A7RIV
This was used in Manual Mode so as to avoid the camera from adjusting shutter speed and capturing what ‘it’ thought was the perfect exposure. The idea with this was to capture the day becoming gradually darker as the tide came in; anything other than Manual Mode wouldn’t give this as the camera would slow its shutter to allow more light onto the sensor.
Manual Focus was also used in order to prevent the camers from ‘searching’ for something to focus on as light decreased.
Lens: Sony 16-35mm f/4.0
Wide enough lens to enable a compostion of the entire scene.
Tripod: Manfrotto MT055CXPro4 – Carbon Fibre
A MUST when it comes to shooting timelapse; not the model of tripod…but a tripod.
The only movement in the timelapse should really be within the scene or from a slider (if you’re using one) rather than from the camera wobbling or being knocked.
Case Relay from TetherTools
Extended shooting time calls for extended battery life, and although the battery in my Sony A7RIV is more than enough on a photo shoot, for continuous power over a number of hours an alternative is called for.
This was the first time I’d used the Case Relay from TetherTools in the field, and I tell you what…it performed brilliantly!
The Case Relay consists of a dummy battery that fits in where your camera battery ordinarily would; it’s then plugged into a portrable power bank and that’s it…done.
This kept me shooting for the full 4.5 hours having only used 25% of the power in the Power Bank BUT the great thing about the Case Relay is that if I had to change the Power Bank I could unplug it and plug in a fully charged one; whilst doing so it keeps your camera powered up. Outstanding!
CLICK HERE for more information about the Case Relay.
I’ll also be doing a short video v.soon to show it in action.


H&Y Filters
So as to maintain detail in the shadow / darker areas of the harbour but also maintain detail in the sky, I decided to use a Graduated Neutral Density Filter.
I’ve not used filters much since starting out on my Landscape Photography Journey because I always found them cumbersome and generally an annoyance. I bought a load of LEE Filters kit a whileback now and it’s hardly been used because, well…it was just a hassle.
However, a great friend of mine, Paul Genge, who runs a company called PhotoTEQ , put me onto some filters from H&Y that are magnetic. This ultimately means no faffing about attaching filters and moving them into position; the magnet just works and works great!
There’s more I could say about them, and I will at some point, but for now the convenience alone means I’ll be using them much more; I guess that’s why they’re called H&Y get it? HandY 🙂
Here’s a (non-affiliated) link to the ones I’m using: (LINK)
For this timelapse I used a 3 Stop Neutral Density Filter (Soft Grad)…


Camera Settings
As for camera settings, although not set in stone, here’s what I dialled in for this location and the lighting when I was there…
Aperture: f/5.6
Shutter Speed: 1/50sec
ISO: 160
Interval Shooting / Timelapse Settings
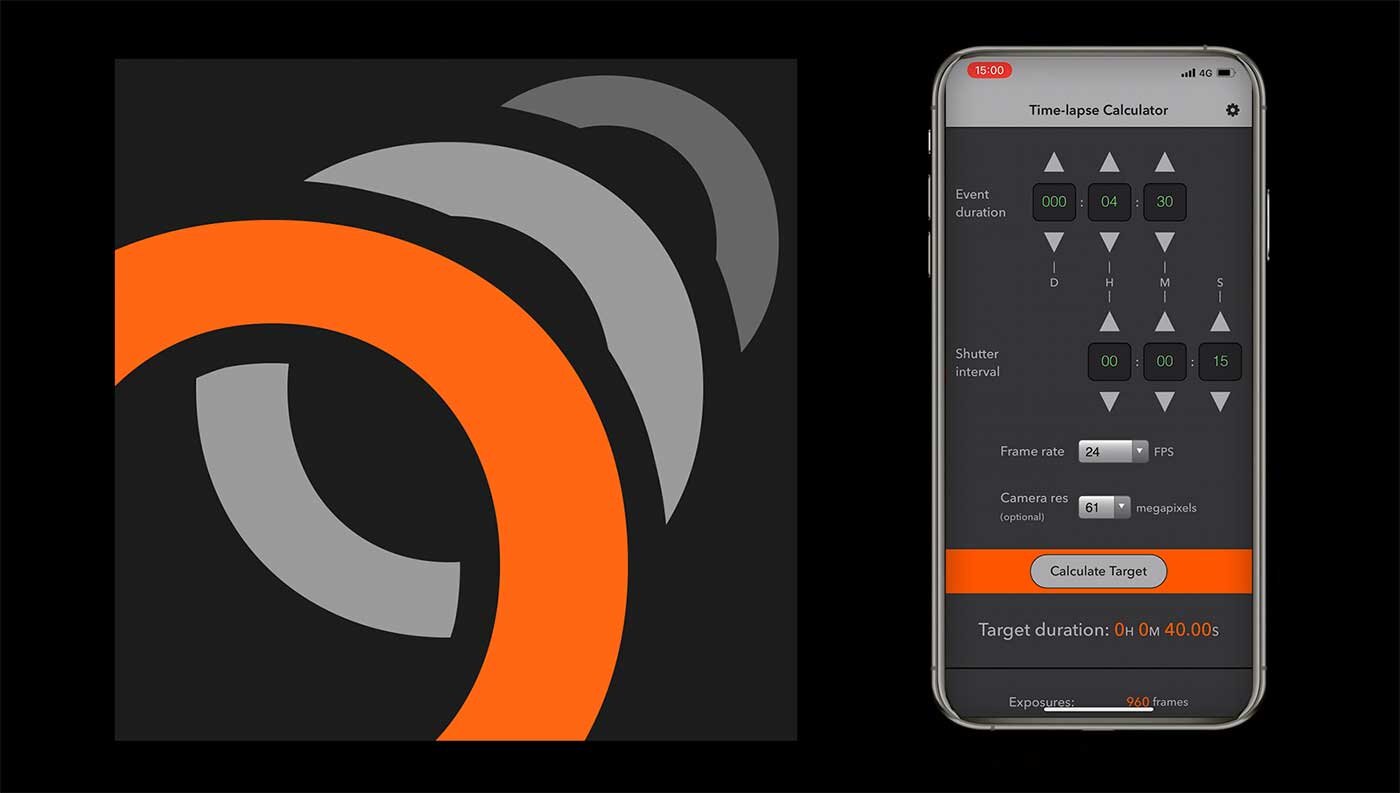
The amount of photographs needed to shoot for the 4.5 hours with an interval of one photograph taken every 15 seconds and with a frame rate of 24fps, worked out to a total of 960. Working this out was made super easy using an app on my iPhone called Time Lapse Calculator (details below)
Knowing this, it was then just a case of dialling the settings into the camera…

Time Lapse Calculator App
A great app for working out things like how many images you need to take for a timelapse of any given length is the Time Lapse Calculator.
For this timelapse I opted to take a shot every 15 seconds and the app then told me how many photographs I need the camera to take to cover a 4.5 hour period…so easy!
Once ready, it was then just a case of starting the interval shooting and kicking back for 4.5 hours (with fish and chips planned…this was made a whole lot easier)
In Closing…
Creating timelapses and then adding them into videos is such a lot of fun. Doing timelapses also guarantees that every time you go out with your camera, you’ll come back with a result.
For extended timelapses like this one where the camera is running for a number of hours, it’s certainly best to have someone else with you if you can; you can pop to the toilet if needed, you can go grab each other a bite to eat and a regular drink etc…
You’ll notice on one of the tripod legs I’d wrapped an orange reflective tabard. That was simply to keep interested people back and to make the black legs of the tripod more noticeable.
Right, that’s all from me other than to say I hope this is in some way helpful and maybe encourages you to get out and create your own timelapses.
Keep well,
Glyn